The Resident Evil 3 Remake demo has finally dropped, and boy howdy is it awesome. I’ve already put several hours into it across all three platforms it released on and exhausted every possible avenue for exploration. The area we’re given access to isn’t even that large, but it has a remarkable depth to it compared to the demos for RE7 and REmake 2. Part of that depth comes in the form of Mr. Charlie, a bobblehead figurine that’s hidden throughout the demo and can be destroyed in order to earn points for your Resident Evil Ambassador account.
Just like RE7 and REmake 2‘s bobbles (Mr. Everywhere and Mr. Raccoon, respectively), the Mr. Charlie dolls are hidden in some pretty devilish places — however, there’s a little more to it this time. In the same spirit as the RE7 demo’s infamous Finger puzzle, several of these figures require completing some downright bizarre hidden objectives that are almost impossible to figure out on your own.
As such, we’ve put together a handy guide to help you complete this task and master the Resident Evil 3 Remake demo! For some of the harder ones, we have to thank users in the Resident Evil subreddit who managed to figure out this stuff in a matter of hours. NOTE: This does contain some spoilers for the demo, so we suggest beating the demo at least once on your own and then using this guide to clear up whichever bobbles you missed. There’s 20 of them, so don’t get frustrated if one is slipping you by!
Mr. Charlie 1: Subway Tracks
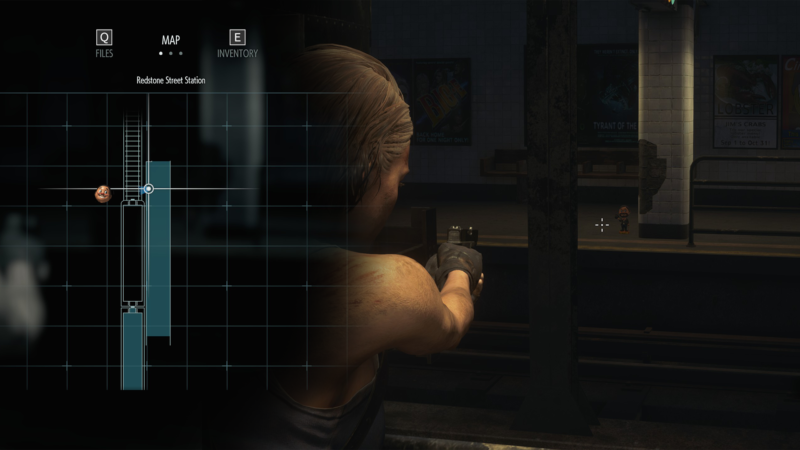
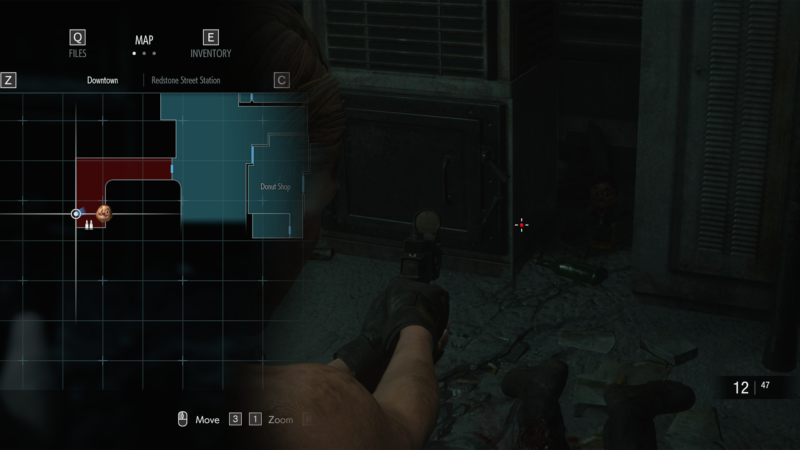
The first bobble requires your first bit of exploration; exit the train car you begin the demo in via the doors to the far north. Once you’re out on the platform, run to the end of the train itself and look out across the empty tracks. Positioned on the opposite platform is your first Mr. Charlie. Bang!
Mr. Charlie 2: Subway Entrance
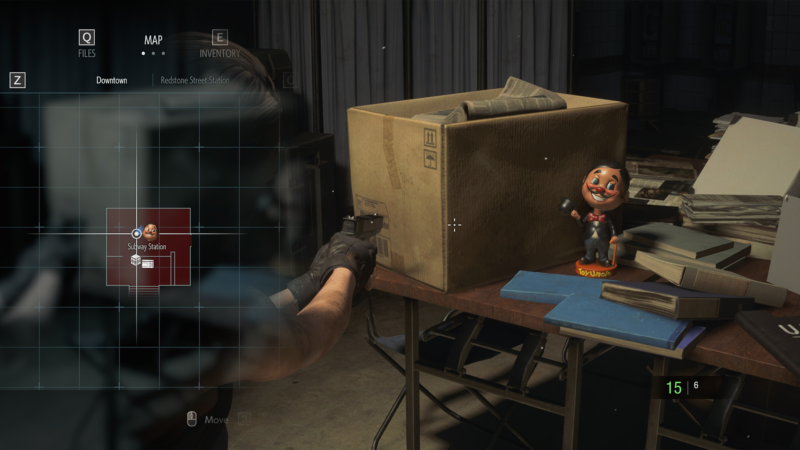
The next Mr. Charlie is by far the easiest to find, as it’s nearly impossible to miss. Taking a prominent spot on the desk set up in the middle of the subway entrance (the same spot where you find the UBCS Herb Field Manual), this bobble is just begging for your knife.
Mr. Charlie 3: Ambulance

The third Mr. Charlie bobble is located inside of an abandoned ambulance, sitting right outside of the subway entrance. Once you exit the subway and the cutscene plays, turn and look directly behind you, and you’ll see an ambulance surrounded by body bags. You’ll probably want to deal with the zombie first, but once he’s out of the way, Mr. Charlie is sitting inconspicuously in the back of the open ambulance.
Mr. Charlie 4: Beyond the blockade
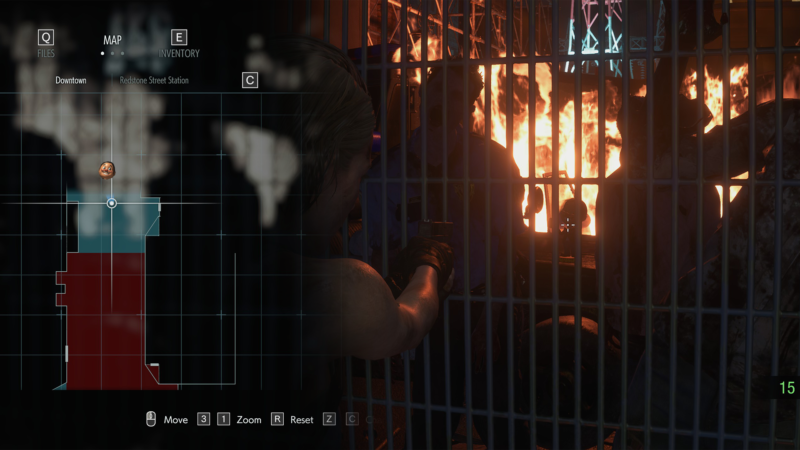
This next one is located just beyond the fenced-off barricade at the far end of this same street. After the “tall drink of water” cutscene, turn to your left and aim beyond the zeds and into the fire. There he is, sitting atop one of the burning cars.
Mr. Charlie 5: Besides the steps

This next one is squirreled away next to the steps you take down from the main street towards Moon’s Donuts. Move towards Rich Clothes and turn right, looking back at Toy Uncle. The bobble is lurking beneath the scaffolding to the left of the steps.
Mr. Charlie 6: Roof construction area
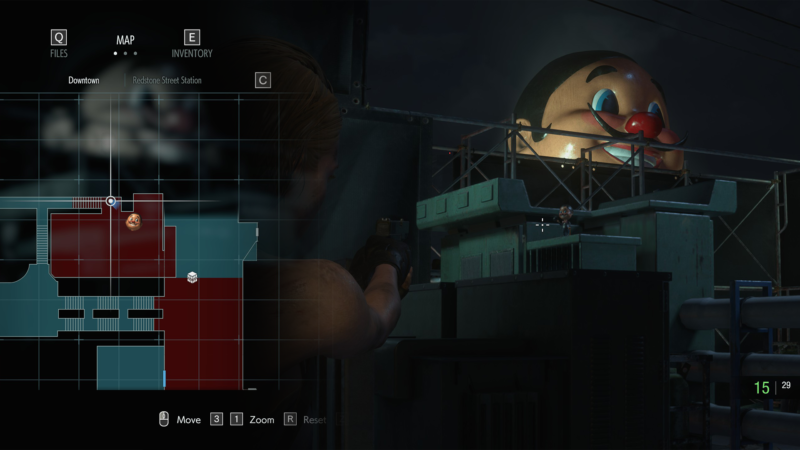
Starting right from where you shot Mr. Charlie 5, turn left and run up the stairs and then turn right. Up those stairs, you’ll find your next Mr. Charlie wobbling at you from on top of some of the power boxes. Make the giant one across the street watch you cap this tiny one in cold blood.
Mr. Charlie 7: Storage Room
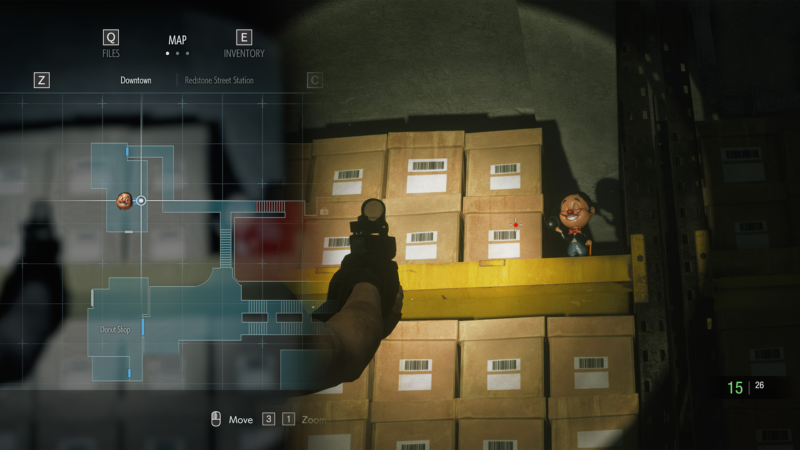
Turn right back around from where you shot Mr. Charlie 6, and follow the walkway to the storage room (the place with the safe). There’s a big shelf in the middle of the room; walk around the East side of the shelving. He’s sitting on the upper shelf, in amongst the filing boxes. What is he even doing here anyway, what is he searching for? End his curiosity.
Mr. Charlie 8: Under the railway

Exit the storage room and make your way out onto the fire escape. Directly above you are the tracks for an elevated railway. Scan the support beam spokes — in the darkness, he bobbles. Turn him to blue “You Got Him!” particle effects.
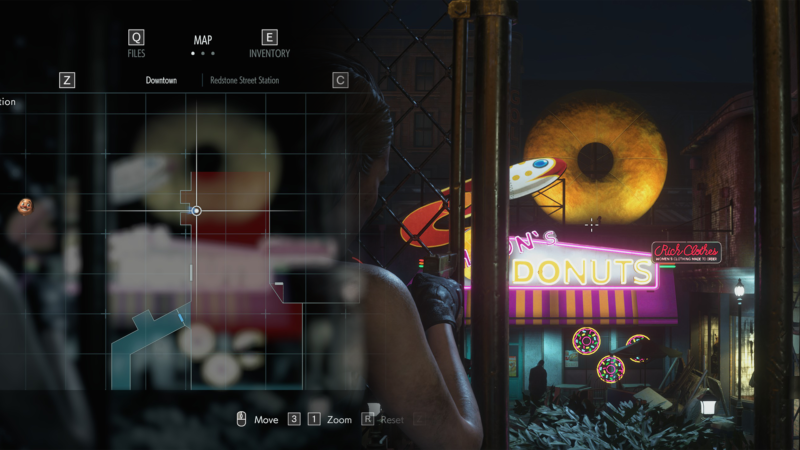
Mr. Charlie 9: Moon’s Donuts roof
Turn slightly to the left, looking away from the elevated railway and towards Moon’s Donuts. There he is again, skulking about the roof of the pastry shoppe! Nail that little creep!
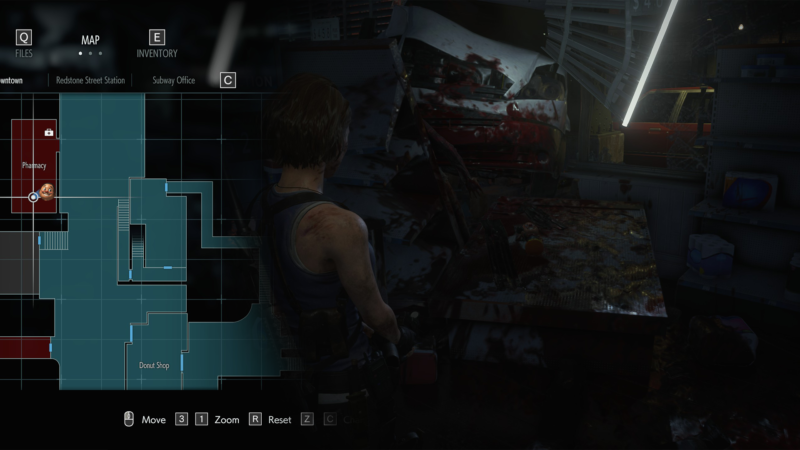
Mr. Charlie 10: Pharmacy
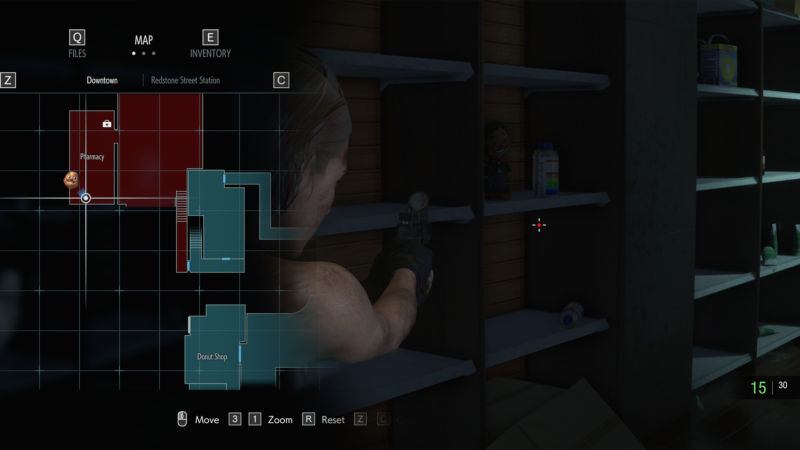
Run down the fire escape and cross the street, entering the Pharmacy. Once inside, turn left and walk towards the Aqua Cure poster, and once there, quick turn and search the shelving for his plastic visage. He’s hiding amongst the medical supplies! Does he think he can escape judgment!?
Mr. Charlie 11: Kite Bros Railway
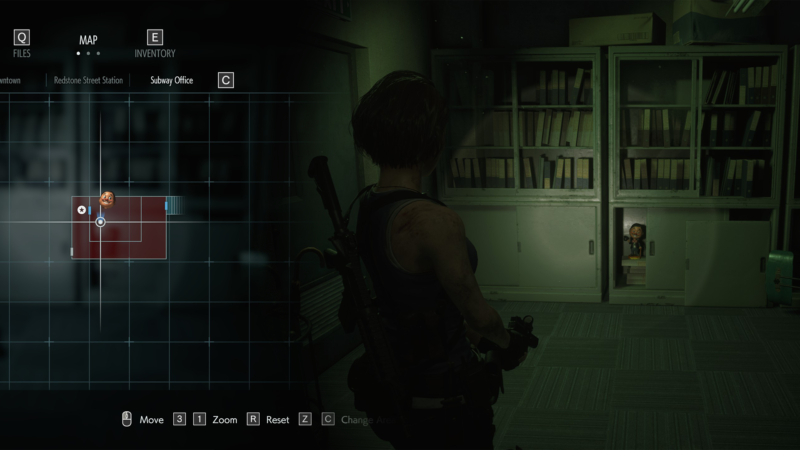
Exit the Pharmacy and turn right. The next building you’ll pass is the Kite Bros Railway, step inside. Make your way to the office with the shotgun, and turn left just as you enter. His eyes stare blankly out at you from amongst the files lining the bottom shelf. Again, he searches for knowledge in amongst this dead city’s paperwork. His dark designs must be stopped!
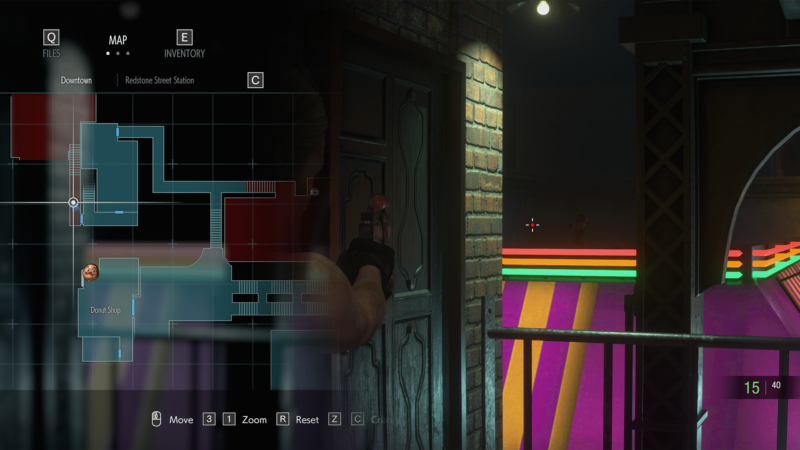
Mr. Charlie 12: Inside Moon’s Donuts
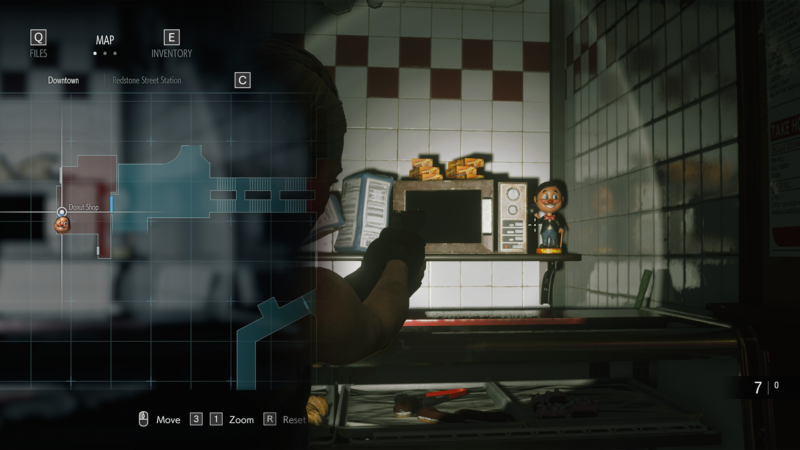
Exiting the Pharmacy, turn right and head towards Moon’s Donuts. Once you enter, turn to the right and look across the countertop. He’s sitting next to the microwave, smiling as if hoping you’d forgotten. Show him you haven’t, with lead.
Mr. Charlie 13: Supermarket
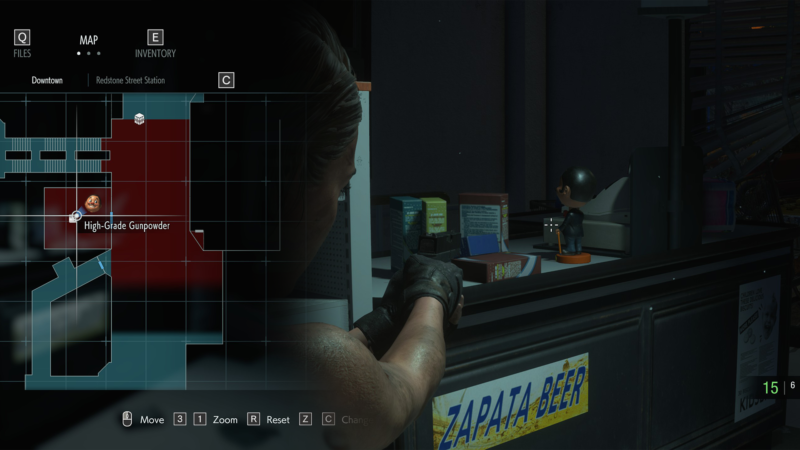
Once you grab the bolt cutters from inside the Moon’s Donuts Safe Room, run back out onto the main street. Here you can break into the otherwise chained up supermarket (the place with the Umbrella Noodles sign on the door). Inside, walk a little ways straight forward, then turn around and look to the left, at the cash wrap. There he is — make him suffer.
Mr. Charlie 14: Chained-up alleyway
Run back through Moon’s Donuts and onto the street with the Pharmacy. Directly across from Moon’s Donuts is a chainlink fence, with the gate chained shut. Break into that sucker and clear out the ghouls, and once you have some breathing room, find the dead USS soldier. Across from him and in between two of the power boxes, sitting on the ground, is our target. Once again, send him to meet Charon.
Mr. Charlie 15: Burning alley
Once you’ve acquired the hose and are ready to end the demo, run over to the burning alley and put out the flames. Now that the alley is accessible, aim your pistol and edge your way slowly down it, looking to the North. Be extremely careful here, as venturing too far will trigger a cutscene and end the demo. Once you see the door, follow the piping above it and try to spot the grey vent. Placed on top of it, perhaps to mock us in its precarious placement, is Him. Take out your frustrations and finish it.
SECRET CHARLIES
Secret Mr. Charlie 1: Moon’s Donuts roof
Okay, this is when they start getting complicated and require some Finger Puzzle tomfoolery. A little ways up the street, once you cut through the alleyway (the one where you can see the STAGLA sign), you’ll find Toy Uncle — home of the Charlie. Look in through the middle window, in between the Arthur and Mega Man posters. Inside you’ll see a Mr. Charlie poster, advertising the little bastard. Stare at this poster for a full ten seconds. Once you’ve done so, turn and look at the Moon’s Donuts entrance.
Look at the massive donut on the roof and you’ll find him. Silhouetted against the faux pastry is the form of the beast. Dispense him.
Secret Mr. Charlie 2: Roof construction area
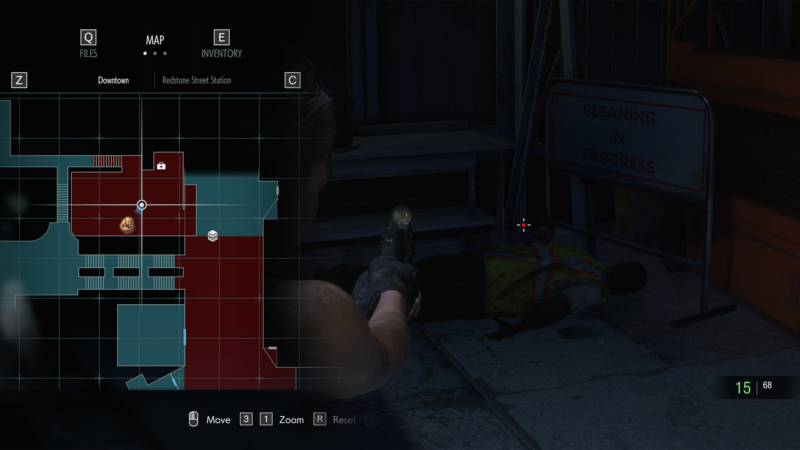
This next one starts a cycle of more complicated bobble massacre. This one only appears after you complete a set of tasks after acquiring the bolt cutters. Collect the high-grade gunpowder inside the Supermarket and Pharmacy and combine them into Magnum ammo. Keeping the ammo in your inventory, run and check in on Mikhail in the subway car. Once you’ve done both of these, run back onto the roof from Mr. Charlie 6 and search for a Cleaning in Progress sign. There should be a dead construction worker zombie below it. Just beside him, the demon has appeared. Cleanse this Earth of him.
Secret Mr. Charlie 3: Police Car 1
Once again, this requires a task in order to force Charles to materialize. This might actually be the trickiest, but most rewarding, of the whole bunch as it requires you to hone your skills with Resident Evil 3 Remake‘s new dodge mechanic. Just as an enemy is attacking, tap RB/R1/Space holding a direction on LS/L3/WASD allows you to leap out of harm’s way. It can be very difficult to master, but once you’ve gotten the hang of it, it’s a lot like riding a bike. The key here is to get 25 perfect dodges, which is indicated by a flash of white around the edges of the screen, and the ability to execute a slow-mo counter on your attacker. This may take some trial and error, so don’t get too frustrated. There’s a couple of good spots to do this in, back where the ambulance was, out front of Moon’s Donuts, and in front of the Pharmacy. I’d recommend only going up against one zombie though, rather than trying to juke an entire group.
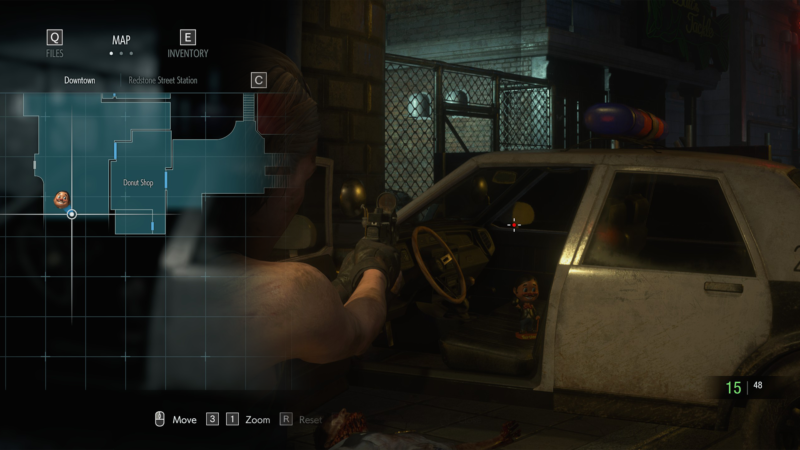
Once your task is completed (remember —25 perfect dodges), head back to the area between Moon’s Donuts and the chained fence from Mr. Charlie 14. To the left of that fence is a broken down barricade, and a police cruiser. Walk around the car, and the door should pop open, dumping the corpse one of Jill’s coworkers to the pavement. Look inside — his killer leers at you from the driver’s seat. Make him pay for what he did to your compatriot with a bullet.
Secret Mr. Charlie 4: Police Car 2
This one is arguably the hardest to get, thanks to the beast you must defeat. That’s right, this time your secret task is defeating Nemesis, three times no less! This is a lot easier to do on the Assisted difficulty of course (which you get access to for dying a whole bunch), so don’t worry if that ends up being the only way you can get this done. Once Nemesis appears outside of Moon’s Donuts (which happens after you acquire the hose from Kite Bros), lay into him with whatever firepower you’ve got. Even better, utilize the grenades you can find, as well as the static discharge from the power box outside of Moon’s Donuts. You can also blow up the red barrels to deal massive damage on him, if you haven’t already used them to send a few zombies to their maker.
The only way to tell that you’ve officially downed him (rather than just stunned him) is if he gets super dramatic about it. Raising his arm up into the air and howling in frustration, he then smashes his fist down into the pavement and regenerates. Doing this three times will finally give you access to the master he was protecting: Charles. The door to the police car out front of the padlocked entrance to Toy Uncle will now pop open, as if by some dark magic. The officer inside will slump out, revealing, once more, the chilling glare of a figurine embodied by darkness. Take care, that cop isn’t as dead as the previous one, so allow your fellow officer the mercy of a killing blow before damning the beast once more.
Secret Mr. Charlie 5: Pharmacy
This final one isn’t too tricky, but still hidden behind executing a task. After putting out the fire with the hose, head back over the cop car from Secret Mr. Charlie 4. There should be a zombie situated amongst the crashed vehicles now — cap him.
Run over to the Pharmacy once again, and you’ll find that a corpse that had been splayed out across from the Aqua Cure sign has resurrected into yet another infernal zombie. After taking care of him, check the bloodied spot where he once lay, beneath the crashed car. There, amongst the gore, lies the source of the nightmare. Destroy Mr. Charlie, and end this madness once and for all.
And with that, you’ve done it! Mr. Charlie, or whatever he is called in the ancient tongue, has been sent back to his domain of pain and anguish. You’ve completed your holy task, and may now move on to the full experience when Resident Evil 3 Remake launches April 3rd! …Wait, there’s probably more Mr. Charlies in the main game! The nightmare is far from finished, and we will be there to aid you once more in putting an end to this hell for all time.