So you’ve decided to take on Capcom’s biggest, most action-packed entry in the Resident Evil franchise. Finding yourself a little stuck? Trying to get an S for time but are stuck at the boss battles? Just trying to make it through to the next level? Don’t want to be spoiled by YouTube videos that show the whole level? You’ve come to the right place.
RoH has compiled a list of strategies for each boss and miniboss. We’ll explain how you can defeat these bosses using the weapons that you find on your first play-through while striving for a ‘no-spoilers’ atmosphere. Be warned though, simply by looking at the boss list you’re in for a few spoilers. If you want to remain spoiler free, just play the game first. At the end of each description, we’ve included a video that pretty much utilizes one or more the strategies discussed. The guides utilize the weapons that you pick up in the game and they’re at the appropriate level (for example, there’s no unlimited ammo’d magnum here).
We have gathered this information from personal play-throughs, online experiences and Capcom’s official guide.
Enjoy!
Chapter 1-1: Public Assembly
The Executioner 
So you’ve made it to the little shack and are watching Reynard face punishment for his actions. By some miraculous turn of events, the Majini on the execution platform turns and sees Chris and Sheva, and has sent an army of infected village people (not to be confused with the Village People–we’re not sure which would be worse) in your direction.
The first thing that first-time players are going to want to do is barricade the shack. Walk up to the sides of the book-shelves on the sides of the first window and the only other door in the building, and push (or instruct Sheva) to push it to cover those entry zones. Collect the ammo and if you’re feeling sure-shot, shoot through the windows at the oncoming Majini. This will help you gain an advantage on your Accuracy score, while keeping you safe in the confines of the shack.
More experienced players might just opt for collecting the ammo inside the room and break out into the alleyway. Either way, you have to wait for your helicopter to arrive. There’s no way that you can speed up this process. Chris doesn’t seem to call for help very quickly when the battle starts, either. After a short while, when Kirk says he’s on his way, more Majini storm the house and the Executioner Majini makes his appearance.
On first play-throughs, the Executioner can be difficult to handle. Different areas of his body deal out different amounts of damage. For instance, shooting his body dishes out normal amounts of damage, while shooting his head deals out 10% more damage. However shooting his legs and arms deals less damage, with -20% and -40% respectably. Many enemies in RE5 are like this, you just have to know where to hit. A beginner’s best bet in this is to stay far away from The Executioner and slowly take him down while trying to move past all the other Majini. Once the chain fence is broken down, take a right down the small alleyway toward the combustible barrel. Once he walks near it, shoot the barrel and you can inflict a lot of damage. While he’s down, run in and perform a contextual-based attack on him (punch him or something). Sheva will come in and do a physical attack, but then watch out—this usually (in my experience) sends him into a spin attack, which will knock you down. If you’re already hurt, this can inflict the “Dying” status. If Sheva tries to come in and save you and is also hit, which is likely, it’s game over.
Once you’ve performed the contextual moves on the Executioner, run further down the alley, back towards where you started from. Make a right and head toward the hollowed-out bus, where you can turn around and shoot more combustible barrels to stall the Executioner, and other Majini in the area. This will give you time to collect some ammo in the bus, and any other areas in the immediate vicinity. Next, get out of the bus head towards the front of it (where the barrels were). If you look up, you should see an electrical transformer. Stand back, as it’ll hurt you too if you’re too close. Time it right and shoot the box to fall on the Executioner and Majini. This should stun him, if not, turn around and run into the building. There’s lots of ammo in here, so keep this in mind—but there’s also two collapsible walls which the Executioner can break through. Collect the ammo and health if you need it, and jump through the window on the opposite side. You can always return to this area later.
There are three more hazards that you can use to bring the Executioner down. It’s important to note that in Normal mode, he will come up the stairs, but will not jump far to get to you. So if you just want to get through the level, take the stairs on the right once you jump out the previous window up to the roof, where you can jump over and wait on the bus. Here, you just have to pick off the Majini, as they will jump onto the bus to attack you. Another safe area is inside the bus. Be sure to pick up the Vz61 Machine Gun in the top right side of the map. This is your only chance to get it for free, and with the ammo lying around, you’ll have plenty of opportunity to fill it up as well.
For experienced players… Keep using the hazards located around the level to bring the Executioner to his knees. On higher-level difficulties, the Executioner’s walking speed is increased, and the liklihood that he’ll jump to reach you is increased. To save ammo, use contextual-based attacks and collect the ammo in the various crates throughout the levels. Using the shot-gun hold on a higher-powered shotgun, or a Magnum if you’ve got it, the Executioner goes down fairly quickly with a properly aimed shot. Collect the “Gold Ring” once you’ve brought him down and finish off other Majini in the level while collecting the ammo. Be sure to use either a grenade or while the Executioner is still alive, have him knock down the stands at the far end of the map. You can find more items and ammo stored in them. For those of you unfamiliar the shotgun (or other weapon) hold is a process by which you just hold down the fire button and keep it held down until you need to reload. You can do this with pretty much any weapon except melee or thrown weapons.
Chapter 2-1: Urban District
Cephalo

Note: Considering that this is an enemy you will regularly encounter in the game, we’re only going to detail this battle, with no video to accompany.
The poor girl didn’t stand a chance. Luckily, you do. Once you inflict enough damage on her, the parasite she was infected with will appear. Known in Resident Evil 4 as Plagas, this time around they’re referred to as Cephalo. Body-shots will work on the Cephalo–they deal about the same amount of damage as if you hit the appendage. The Cephalo will walk briskly, climb ladders and jump to get to you, and even when you knock it down, the whipping appendage still deals damage. Shotguns (you did collect the Ithaca, right?) work really well in this situation. Watch out for other Majini to make their way into the room to make this battle a little more difficult.
You can back-track through the entrance you came into and climb up the ladder to the roof of the building where you picked up the Ithaca if you need to, so you can pick off the enemies one by one. More experienced players with upgraded weapons should find this fight a breeze. A headshot and a flash-grenade put an end to the first Cephalo with ease.
Another method, while not always recommended, would be just to high-tail it out the door…if you wanted to.
Uroboros
When you first enter the main furnace room, the game makes it clear that the furnace plays a big role in this boss battle. Uroboros is a tough enemy for this stage of the game, but not impossible. Fall back into the furnace room and knock over the canister to your left. But don’t turn around and shoot just yet. Instruct Sheva to wait by the controls for the furnace. You on the other hand, run inside the furnace, making sure that Uroboros follows you. Once it’s inside, shoot the canister that it picked up, so it’s stunned (actually exploded). AI Sheva will tell you she’s turning on the furnace, so get out of there. The furnace will turn on and melt Uroboros. If Uroboros grabs you, follow the on-screen prompts to free yourself. Your partner can also save you, but it’s usually pretty easy. It may charge rapidly in a straight line—it’s usually foreshadowed by a distinct “rearing up” posture. If you don’t press the corresponding button, you’ll be grabbed.
Watch out for piles of goop that Uroboros leaves behind—they can cause damage to you or your partner. Also watch for when it teleports from one place to another on the map. It will start to drop little pieces of itself where it is going to appear next.
Experienced players will be interested to note that because Uroboros is weak against fire, you can also use fire-grenades, the flame rounds in the grenade launcher, or…Rocket Launcher, if you so desire. You also have the two canisters at your disposal as well. Knock off both of its arms with the canisters and shoot it at close range, you’ll get a nice Gold Ring for your lost ammo. On higher-level difficulties, the furnace trick doesn’t work on the first try. You can do this to wear Uroboros down significantly, then end the battle with a powerful firearm. As long as you end the battle with a weapon, you’ll still get the Gold Ring.
Chapter 2-1: Shanty Town, The Bridge
Big Man Majini
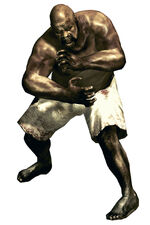
The Big Man can be dangerous during your first play-through, but don’t be alarmed. Shotgun-holds work well against him, as long as you stay far enough away not to be knocked down with his lunging-punch, He will attempt to shield himself by raising his arms, and can slip through windows and climb ladders. He’s big enough that you can’t knock him down while he’s doing these things, either. Just keep firing. Reposition and fire–but make getting rid of him one of your first priorities in this area.
Chainsaw Majini
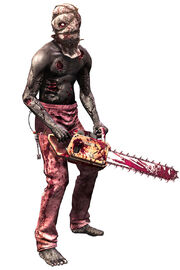
Okay, this guy is a pain. We’re sure every infested locale has its own chainsaw nut. You’ll know he’s coming too, because he laughs and revs his chainsaw’s motor, lunging at you. Just like back home…
The game throws you into a very difficult predicament. You have limited space, and an enemy that has a one hit kill (DECAPITATION!!!), plus a horde of Majini to make matters worse.
Start the battle off right by flipping around and running down the stairs. Turn to face him again and just above the bottom of the stairs, look up–another transformer box! Shoot the transformer box once he’s below it. Turn around again and run, blowing up the explosive barrels as he passes them. If you stocked up on shotgun ammo, use it. The shotgun hold works extremely well here.
If you’re running low on ammo or just feeling brave, when Chainsaw Majini is stunned, run up and do a melee attack, then get out of there quick! He is stunned when he either stumbles backward, holding his face with his hand, or when he falls down to one knee. Continue the process until he’s on the ground (as in dead). In higher-level difficulties, the odds of him staying down decrease significantly. If you step forward to claim your prize, make sure that the chainsaw is not running anymore (cause when we die, we turn off all equipment we’re using with our final ounce of strength). If the chainsaw is still running (if you can still hear it) it means he’s just faking. When he rises back to his feet, he’ll be delirious, swinging the chainsaw from side to side, possibly coming dangerously close to your neck. When he’s ready to sever your head, he’ll rear back with the chainsaw. When he does that, you have maybe two seconds to shoot him and knock him back. Otherwise, it’s a mandatory visit to the Game Over screen. The general swing of the chainsaw inflicts the Dying status, so either way, you want to distance yourself. Keeping a fair distance between yourself and Chainsaw Majini isn’t easy, either. This guy can jump an entire floor without using a ladder, but he cannot climb through windows. Use that to your advantage in this area. Grenades and proximity mines can slow him down, but it takes a serious amount of direct damage to stun him. On higher-level difficulties, you need advanced firepower to put this guy down. Use the magnum or upgraded rifle. In co-op games, have your partner dispatch the Majini when they’re not busy dealing blows to Chainsaw Majini.
Chapter 2-2: Mining Area
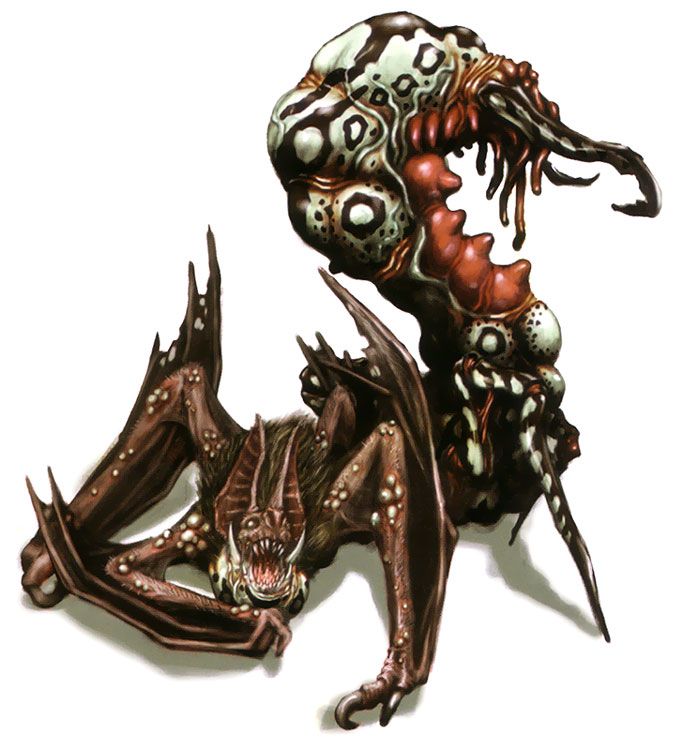
Popokarimu

This boss is generally merciless in his pursuit. A player’s first instinct is to take refuge in the little shacks that are on the battleground. But the shacks, while full of items you’ll need, are flimsy and can (and will) be knocked over. It is possible to outrun Popokarimu on any difficulty level. Knowing that, you can keep well ahead of it until you know where you’re going. Pick up the Proximity Mines in the first couple of barrels and do a few once-arounds of the area to get a feel for it. It’s basically just a big circle with a few shacks. You can collect all of the ammo and herbs and then set up your traps. Use the Proximity Mines to lay down traps for Popokarimu to step over. You can shoot them and stun him, or let him walk over them and he’ll fall over. When he does, you’ll want to shoot the exposed part of his body, on his tail. Use the shot-gun or rifle if you’ve got it, but handgun rounds will suffice.
Players in co-op can split up and have Popokarimu in between the two players. When Popokarimu is facing one character, the other can shoot at the weak spot. Watch out for QTEs and a sticky fluid that Popokarimu shoots out of its behind. There’s also a sonic shriek, in which the boss spreads his wings and screams to stun you, lunges, which you’ll need those QTE’s to escape, and a tail-flick while Popokarimu is flying—generally used to destroy the shacks you might be hiding in.
Chapter 2-3 The Port (Night)
Ndesu
 Ndesu is the only boss in the game that you can’t kill with your own weaponry—you have to use the chain-gun supplied to defeat him. A few Majini show up to make a sometimes tough battle even tougher, with one on the left side on the balcony, and two on the right, next to a conveniently placed explosive barrel. It’s important to pay attention to Ndesu’s attacks during this battle. He follows a set pattern, and that pattern should be learned as quickly as possible. Even if you can’t learn it, there are ways to tell what he’s about to do next.
AI Sheva has impressive aim–and she knows where to shoot. You don’t have to worry about her missing, but she won’t go out of her way to shoot those Majini on the side of the screen so make it your duty to. They can deplete your health by throwing Molotovs and shooting arrows at you. Take them out when Ndesu is close to you, as when you need a context-sensitive action, you can perform that action while you are aiming at the Majini.
After enough damage has been inflicted, several parasites will erupt from beneath Ndesu’s flesh. Shoot them until they disappear, and his back will burst open with a large parasite. Focus all of your energy on that large parasite unless you’re being burned to death by the re-appearing Majini on the sidelines. He has several attacks that can critically injure you, the first being the telegraph pole swing. These can be ducked with QTE—failure to do so can really knock your health back. The more difficult attack to avoid is the Boulder-Throw. A neat trick to do once he picks up the boulder is to shoot another explosive barrel next to him, in which case he’ll drop the boulder and you can keep attacking him. If the barrel is gone, shoot at the boulder until it breaks apart.
Shoot Ndesu in the head if he’s getting ready to charge at the vehicle or stomp it, or crush it with a telegraph pole. In co-op mode, it’s best to have Sheva’s machine gun on Ndesu at all times, as her gun has a start-up period. Chris’ gun has no start-up period, so he can pick-off the Majini easier than Sheva can when there’s a lull in the battle.
Chapter 3-1: Marshlands, Village
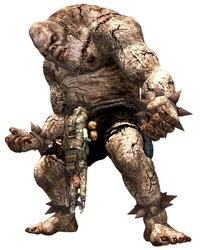
Giant Majini – First Appearance

You can hear the cry of the Giant Majini as you approach the far right side of the village. The distinctive sound when you’re low on health is enough to make you sweat. It’s difficult to stun the Giant Majini, but that’s why you should collect all of the ammo on the left side of the village before you head to the right side.
Pick up the S&W M29 Magnum to make the battle a little easier. When you enter the village, stick to the left side. Collect as much ammo as you can, make sure all of your weapons are fully loaded, and make your way towards the right side. You can collect the S&W magnum if you wish, to make the battle easier, but you can always collect it after the battle and avoid falling into the trap that awaits.
This battle puts two of them into play, so first-time players will need all the help they can get. Even with upgraded shotgun power, Giant Majini are tough buggers. Their gigantic masks cannot be broken, so concentrate fire on their bodies. An upgraded shotgun blast will knock him back, but not necessarily stun him. If you fell for the trap and picked up the Magnum, don’t feel too down, you have a bit of an advantage as you’re partially protected by the spikes, and you have a powerful handgun at your disposal.
Take out the Majini that surround you quickly so you can focus your efforts on the two Giants lumbering towards you. Run to the one building with two levels. Climb up the ladder and wait on the second-level, near one of the torches. Knock the torch down to light the enemies on fire. Be quick, because Giant Majini can jump up to your level. Watch for QTE, even when you’re seemingly a safe distance away from the Giant Majini, as he’ll leap forward and come down on you. When in close range, watch out for kicks and jabs with the giant staff.
The Giant Majini is immune to Nitrogen and Electric damage, but for repeat play-throughs on higher-level difficulties, Acid and Flame Rounds can set you up for a melee stun. Other than that, this is basically a gun, then run routine. Be careful about running around in this level. Several areas are booby-trapped, causing gigantic spikes to rise up out of the ground. More experienced players with advanced weaponry can take the Giant Majini out with a little bit more ease.
In co-op games, luring the Giant Majini and their allies to the entrance of the village may enable one player to run and operate the hand-crank. Their partner, at the village entrance, can then make a dash over the bridge and unlock the other side. Once the Majini are on the bridge, the player at the crank lets go, and the enemies plummet into the pit. However, this robs you of their item drops, which is a nice Blue Enigma for each Giant Majini. If all else fails, the Rocket Launcher found in the Marshlands, just before the Village, serves as a great way to rid yourself of those Giant Majini, and their little cohorts, very quickly. That is, if you want to use it right away.
Chapter 3-3 Oil Field, Patrol Boat
Irving

You don’t get to fight the human Irving. Something tells us that wouldn’t be very interesting anyways. No, what you get to fight is what he turns into—a gigantic water mutant. It’s good to see that there’s mounted guns on either side of Irving’s ship. Like they were put there by Irving so that someone would kill him, should he be turned into such a monster.
AI Sheva will sometimes use her own ammo for this battle. Not advisable, especially when you have so much there. Run up to the turrets and instruct her to use them. She’ll use it until Irving switches positions, and she’ll have to be told again to use it. The turrets at the back of the boat operate machine guns, similar to the ones used by Sheva in the Savannah stage. They require a few seconds to power up to full. The turrets closer to the cabin of the ship operate a rocket launcher. As expected, these take longer to recharge between uses, and should be saved for someone with impeccable aim (i.e.: AI Sheva, although we know you totally want to use them).
Shoot at Irving’s exposed head when he’s on either side of the ship. He will eventually come in close and his tentacles will rise into the air. Make quick work of these, as they can stab into the deck and cause a lot of damage. To you, who cares about the boat?
If you need it, there’s a First Aid Spray near the cabin. Further into the battle, Irving will head to the back of the ship, where the same principle applies. Shoot the tentacles, dodge the spikes, but this time, shoot the laughing little tongue inside the monster. This appears when he latches his tentacles onto the boat. This can be difficult given that you’re trying to do three things at once.
It’s best for both players in single-player mode to shoot the tentacles before shooting for the monster’s tongue. In co-op, focus one player’s attention on shooting the tentacles, with the other player shooting at Irving. Keep this up and the battle should be finished in no time.
Chapter 4-1 Labyrinth
Popokarimu – Round 2
Popokarimu makes its second appearance here, confining Chris and Sheva into a corner. The same tactics as before apply, except now you’re in a much smaller arena. You have stronger weapons now, use them to your advantage. You might have picked up a Proximity Mine earlier on in the level. If you haven’t used it, feel free to do so at your discretion.
You can also run away from Popokarimu this time, but if you do, you’ll be missing out on the Soul Gem, worth a hefty ten grand. The choice is yours.
Chapter 5-1, Underground Garden, Experimental Facility
Licker Beta Horde

We figured we’d put the Licker in here, because the Licker is hard. And when they show up, there are generally a lot of them. Anyone familiar to the series can attest that these buggers are not the friendliest BOWs the Resident Evil universe has to offer. And that’s no exception in Resident Evil 5.
When you first come across the Licker, instead of just the remnants of its last meal, it’s pretty much chilling out with other Lickers in a glass containment room. The Lickers are blind, and Chris or Sheva says something to this effect. You can walk through this area, but it only means you’ll be more heartbroken in the next area, in which you have to kick down a door. Obviously, the Lickers who are blind, not deaf, are going to smash through the window and charge at you.
They travel in packs, and will be alerted to your presence through running, kicking doors, and unfortunately, gunfire. Watch out for their trademark tongues—the Licker’s tongue will puncture right through you. It’s best to call for help when this happens, as getting rid of it on your own is not advisable. Likewise, if your partner is stuck in this trap, do the same for them, or you’ll be seeing a few “Your Partner Died” screens. Likewise if a Licker pins you to the floor.
You can drain all of your ammo in this little battle, so it’s important to note the weak spots. Headshots work well to stun them, but their actual weak point is their exposed heart. If you shoot them enough to land them on their back, run in to stab them in the heart for an instant kill. This battle and the ensuing one, unfortunately are not easy, but using a sniper to take some of them out at a distance, and a machine gun to keep them at bay, could stall a pack’s advance, maybe lowering their numbers before they’re in your face. Leave more distance than you think you’ll need for these guys. The range of the Lickers’ attack is set to foil any player who think they’ll rid these guys with a shotgun. These guys can climb, walk on walls and ceilings, and will use ventilation shafts to their advantage.
The Lickers are weak against Acid Rounds as well, but be careful when firing. Acid Rounds not only hurt your enemy, but anyone in the viscinity. AI or human-controlled partners be advised to stand clear! There’s nothing worse than being attacked by a lancet tongue and then being burned to death with acid.
Kill the Licker Betas and you’ll be rewarded with several Lion Heart gems–which at this stage in the game are a nice treat.
U-8

The U-8 looks big, but this BOW isn’t all it’s cracked up to be. Run around the outside of the big, circular platform and shoot at the exposed areas of its legs. Once it falls, it will be stunned—run up to its head and drop a grenade into its mouth. The explosion will knock off some of the protective shell covering U-8’s brain. If you don’t have a grenade, just fire into its mouth. But really, it’s never come up.
Occasionally the boss will release little babies (err…yeah) which will drop items such as ammo, herbs and grenades, so if you have the space, pick them up and use them. If you don’t have any grenades, or do not have the space to pick them up, consider using a magnum or a rifle to shoot the weak spots on its legs. When it’s down, shotguns and machine guns are effective on its head, when its brain is exposed.
Watch out in this battle for U-8 ramming the platform, stunning you. This boss also releases drones (the babies mentioned before), and tries to grab you in its pincers. Once it grabs you, its Game over. Keep moving to avoid being crushed.
Chapter 5-2: Missile Area, Uroboros Research Facility
Reaper
The Reapers are one of the enemies in the game with a one-hit kill. It’s irritating, and you get to watch your corpse being unnecessarily jabbed with its claws. You first find this fine BOW as an egg waiting to hatch near a long walkway (if you’re lucky). What manner of beast is this? The irritating kind. The Reaper has three weak points—there are yellowish-white sacs on its belly, and some on its back. Normally these are covered, but occasionally the armour peels back and the soft-sac is exposed. Use either a Shotgun or a machine gun to shoot the sacs on its belly when the Reaper stands on its hind legs, usually when it’s ready to kill you. With a successful hit, it will curl over and expose the area on its back. Shoot these, and it will fall back to cover its back, leaving its belly open again. Shoot the belly sac one last time, and it’ll be finished. On higher-level difficulties, you’ll have to do this more than a few times. Remember, keep far away from the Reaper, as even when it’s in its death throes it can still hurt you. Kill the Reapers in this level to collect a Power Stone, which, considering you can always run away, is generally worth it.
Uroboros Mkono

This boss can be very, very challenging, especially on the harder difficulties. Just remember the previous rule when we fought Uroboros before—it’s weak to fire. Fire plays a key role in this boss fight, once again. Except this time, instead of a furnace, you have a “BOW Extermination” device. Also known as a flamethrower.
There are several gas canisters around that you can use to your benefit as well. Uroboros Mikono will do similar attacks as the previous encounter, transporting, grabbing, but this time it will also shoot its arms out at you. The Flamethrower is situated on the east wall. You can’t keep it, and it needs to be recharged between uses. You should instruct Sheva to take the flamethrower. Bathe Uroboros Mikono with fire, exposing its weak spots. When these spots are exposed, have at them with your strongest weapons. Switching weapons between the flamethrower and one of your powerful weapons can take a few critical seconds, which is why it’s usually best to have Sheva using the flamethrower on single player campaigns. Although you can use it should you really, really want to.
Shoot the clusters that hold Uroboros Mikono’s limbs in place. While it’s weakened, have Sheva blast it with fire, while Chris shoots the exposed weak spots at the top of the boss. Its limbs will grow back, and you’ll have to repeat the process until it’s finished. Make sure to place the flamethrower back on its base so it can refill its fuel. Or of course if you have a Rocket Launcher, you know the drill.
Chapter 5-3: Monarch Room
Jill and Wesker

So…it’s important to note that while Jill is technically an enemy, you don’t want to shoot her. Remember? She’s your friend. But she’ll shoot at you—so keep moving in this battle, and keep a safe distance away from both Jill and Wesker. You’ll notice that it’s pretty pointless to try to shoot at Wesker in this state, unless you get an (incredibly) lucky few shots. He’ll dodge almost every attack you throw at him, as long as he sees this. If you do happen to get a few lucky shots in, he usually puts an end to that though by rushing at you.
If you’re in the single-player mode, Sheva will helpfully suggest that you should hide. As a matter of fact, if you want to actually cause enough damage before the seven minutes you have for this first battle is up, it’s probably the only way to go for a beginner. Run towards the first door on the east side of the room. After a few moments, a cutscene will have Wesker break down the door. Get up and turn around and run around the corner. Look on your mini-map for his location, and aim for that corner. It’s best to wait around the second corner, and accordingly aim for that corner. When he rounds the corner, shoot him a few times. You only have a few shots before he’s rushing at you again.
With your power-upgraded magnum, or power-upgraded shotgun is best, otherwise you’re probably just better saving your ammo and waiting out the seven minutes. Repeat these steps a few times before heading off into the maze of hallways to collect the treasures that are here, and the Lightning Hawk magnum but only if Sheva is with you and not distracting Jill. The LH has a few advantages (faster shots) and can be useful in this fight, provided you have the ammo.
Another method for attacking Wesker is to sneak up behind him while he’s stopped in a hallway. Take cover behind a wall where he is, and shoot him once or twice before he darts to your location, then it’s off to another location. This is essentially the same tactic as before, but in different locations. There are several QTEs in this battle, which will knock him to the ground if done correctly. If not, it’s your ass on the pavement with a nice chunk of health taken away.
If you’re in co-op, if you’re going to bring him down in the seven minutes, an idea is to have one player distract him, while the other unloads while he’s not looking. If you have powerful weaponry, this is not exactly a problem (i.e.: rocket launcher, steady aim, you get the idea). However, if he doesn’t dodge from it, Wesker can catch the rocket, pulling it away from his face. If he catches it, he’ll throw it back at you. However, while he’s in the midst of trying to control it, shoot it with a pistol and it will explode. Battle over.
As a reward for freeing up Wesker’s schedule by a few minutes, you get the Heart of Africa jewel. You also get the Bad Blood Achievement/Trophy. You can collect it in the next part of this battle. After the battle with Jill starts, be sure to run and collect it, as well as the herbs on either side of it, should you need them. They’re in between the two staircases. If you don’t defeat him within the 7 minutes, no big deal, there will be other opportunities. However, if you didn’t collect the treasures in the back of the Monarch room within that time frame, you’re SOL for this round and will have to play again.
Jill will run around frantically in this battle as the device on her chest begins to short out. The more sparks there are, the closer you’re getting to the end of the battle. One agent will have to restrain Jill while the other either tries to tear the device off her chest manually, or attempts to shoot it off. Chris will have an “entreat” option onscreen whenever he approaches Jill. The object here is to entreat her, frustrate her, and then grab her. Shooting Jill will kill her, however those with precise aim can shoot the device on her chest while she’s restrained. All weapons inflict the same amount of damage on the device, whether it’s your newly acquired Magnum or a regular handgun. Shooting the device speeds things up considerably in this portion of the battle. But be warned, one missed shot and Jill’s a goner. The choice is yours.
Keep moving to avoid being shot or having your head kicked. Be quick for QTEs shortly after Jill breaks free from you or your partner’s grasp, and be prepared to dodge. This battle can be a pain, but knowing what to do makes things a lot easier.
Chapter 6-1: Ship Hold
Chain Gun Majini

Christ…if you’re not properly prepared for this battle, you’re in trouble. Equipping a bullet-proof vest, available for purchase in the menu, can increase your resilience to the bullets, but not for long.
The Gatling Gun Majini’s gun has a slow wind-up time, and he aims low at first. Take cover behind crates and keep your distance. This guy has a Melee attack that’s quite powerful as well. The backpack that the Gatling Gun Majini wears is impervious to bullet fire. Aim for his head, with a 30% bonus in damage and a momentary stun, should you hit him enough times. For more experienced (and brave) players, the S&W M29, upgraded can shoot the Gatling Gun Majini one or two times and stun the enemy. Run forward and perform a melee attack, shoot it a few more times with the magnum and run forward for another melee attack. This saves on bullets and time, but is risky, especially in higher difficulty levels.
In co-op, have one agent climb the ladder to the upper walkway and the other one stay below. While one of the agents will draw the enemy’s fire, the Gatling Gun Majini can draw the other agent’s fire.
Chapter 6-2: Bridge

So…big enemy. Luckily you have a big weapon on your side. The Satellite Laser Targeting Device is an excellent weapon to take this girl down. It has a major draw though (and it should, or else this boss battle would be a cinch). The recharge time between shots is about a minute and a half long.
At the start of the battle, grab the weapon and head up to the upper level. All of the attacks in this boss battle come from Uroboros Aheri’s tentacles, and are usually sweeps or jabs. Like being smacked with a gigantic eyeball. Later on in the battle, a new attack is introduced, “The Death Slam.”
The tips of the tentacles glow—shoot them there. It’s much easier (and advisable) to shoot with your weapons instead of the Laser Targeting device. To make the battle easier, have Sheva shoot one or two of the tentacles with it, give it time to recharge and take out the others with your weapons. When a tentacle is destroyed, Uroboros Aheri will spit out segments of its body (gross) to be destroyed. These leave useful item drops, ammo, multiple herbs, and grenades. Makes the job a lot easier, and also makes this level prime target for repeat play-throughs to boost your inventory.
Destroy the pods (even after they’ve gone dark) and the centrepiece will open up, revealing a large weak spot, ripe for a beam from a satellite to rip right through it. Repeat the process a few times and Uroboros Aheri is no more. The large centrepiece will go from yellow to red, red being close to death. If you’re going for an S in this round, you need to increase your enemy kills, shoot the growths that Uroboros spits out. You suffer in the time taken to complete the level, but you increase your kills. If you’re looking for a happy medium here, kill as many enemies as possible inside the ship before the battle, and shoot a few of the growths that Uroboros Aheri spits out.
Chapter 6-3: Engine Room
In the Engine Room, you’ll face two minibosses that you’ve previously faced, in addition to Rocket Launcher Majini and a relentless amount of other, armed Majini. Two Reapers released at about the same time, and two Gatling Gun Majini released at the same time. And to top it all off, you still have a boss battle at the end of this! Pack accordingly. As these are all enemies you’ve faced before, I’ll leave the fun of how to dispatch them up to you.
One suggestion is to move slowly, taking out enemies before they can get to you—sticking close to your partner, and ALWAYS checking to see what’s around you. You can shoot through the bars between hangar rooms, use this to your advantage. There are a lot of walkways here, too–enemies will spawn from higher-up and drop down to where you are. While there are many supplies to be found in this level, keep in mind that the enemies keep respawning if you’re not fast enough.
Get through this all and you’re rewarded with a “Something doesn’t feel right,” from Sheva. And you thought it was going to be a prize!
Chapter 6-3: Hangar
Wesker—Pt. 1
Some things to get out of the way before we begin should help you out. Remember in the Monarch Room how Wesker wouldn’t dodge your attacks if he didn’t see you? The same principle applies here—only this time, there aren’t as many corners you can hide behind. Here, the darkness is your friend. Because wearing sunglasses at night doesn’t help you in the dark. And even when they’re knocked off— he still can’t see very well in the dark.
Knowing that, the first thing you’re going to want to do is kill the lights. On this level, there are three switches operating the lights. In co-op, split up with your partner to turn out the lights. In single-player campaign, you pretty much have to do it yourself. The lights won’t stay out forever though, Wesker will walk up to them if he’s nearby and kick the switch back on.
After the lights are off, on the north-west side of the map is a container with a rocket-launcher inside. Break the container and have either yourself or your partner grab it (in single player, we suggest you grab it). If you need more ammo for the Rocket Launcher, the top catwalk has about four more of them that you can grab. Once that’s used up, there’s one more in a crate somewhere on the first level (it’s random). We would tell you to use them wisely, but there’s really only one thing you have to do, and if your aim is right, you’ll do it with less than four shots (or you’re just really unlucky…). One agent distracts him, the other one fires the rocket at him from out of sight. Like in the Monarch Room, he’ll catch the rocket and try to throw it back at you. Take this time to quickly switch weapons and shoot the rocket, engulfing Wesker in flames. Switching weapons can take a few critical seconds, so in co-op modes, make sure your partner has your back.
Now, hopefully when you do this the first time, you’re out of sight, but not far away. Whoever is closest run up and restrain him, and will instruct the other to “give him the shot.” The other player needs to be in front of him and inject him with the shot, and the battle is over.
Wesker doesn’t make this battle easy though. With two kinds of one-hit kill and other hits that will knock you or your partner into the “Dying” status, it’s a wise idea to pack lots of first-aid items, and stay close to your partner, despite the fact that you want to either run away as fast as possible, or just fruitlessly unleash all of your ammo on him. Spend too much time in front of him, and Wesker will plow his fist through your gut. If he reaches the platform that the bomber is on, he’ll pick up missiles in casually launch them your way. If he heads for that platform, hide behind one of the few walls that you can.
The daring can try to get a few shots in while he’s holding the missiles. He’ll blow up, and fall down, but he’ll get back up and jump down to the battle level. On higher difficulty levels, Wesker will routinely throw you over his shoulder when you attempt to restrain him. This is what the other rockets are used for, should you go that route. There are other ways to take him down–read on if you wish. People going through this for the first time should stick to the Rocket Launcher idea. It’s easy and relatively safe.
For others seeking a bit more of a challenge, try this on for size. You can defeat Wesker with your regular gunfire, but it’s tricky. Turn off the lights and hide in the shadows behind him. Before he turns around, shoot him in the back of the head a few times—stagger your shots to observe how he reacts as they hit. If you hit them just right, he’ll stagger backwards, in which you can perform a melee attack on him. Three complete combos is the equivalent of one rocket-hit. It’s the same attack strategy as in the Monarch Room. So you be the judge—try it. If you’re feeling brave. 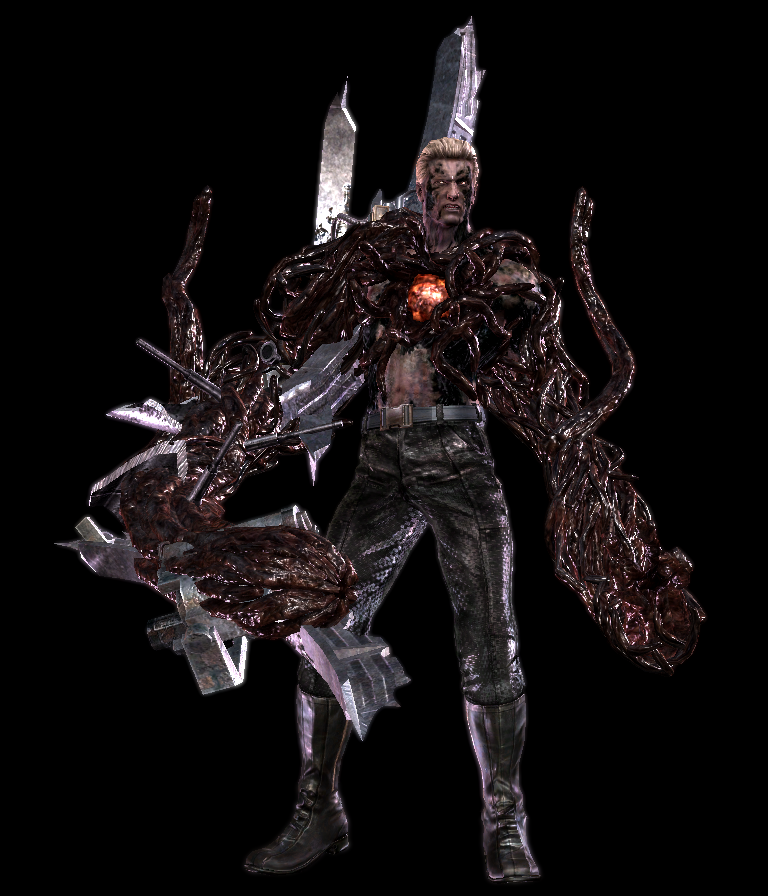
Wesker, Pt. 2
Not exactly too much more difficult from the first part, this battle unfortunately has more chance for one-hit-kills. Keep that in mind and stay as far away from him as possible during the beginning stages of the fight. There’s only one way to go here, and that’s AWAY. If you decided to bring a Rocket Launcher to the battle, here’s a good time to use it. If you equip it, shoot it at the little outcropping of rock that’s just ahead of you as you turn around. It’s just above the walkway. It falls and there’s a rare jewel in there that you can get. After Chris falls and Wesker jumps down to his level, turn around and run again.
If you used the Rocket Launcher, CAREFULLY run past Wesker and retrieve it. Keep yourself away from him, as the tentacles he has will toss Chris into the lava like a rag doll—a kicking, screaming rag doll. Head up the hill and wait for Sheva to shoot him in the heart—on his back. He’ll then direct his attention towards her, jumping over to where she is. At this time, she’ll run ahead, but be stopped by a crumbling rock and will hang on, pleading for you to shoot him. He’ll inch closer towards her, but shoots what the official guide calls “projectile ooze” at you.
……Sigh.
Shoot Wesker a few times from the upper platform, and Sheva will clamber up onto the rocks and continue to distract him while you have your next obstacle to worry about. A frigging rock! Whatever, Chris bulked up over the last couple of years for just this purpose. Jump down off of this platform and over to the rock—ram it, punch it, whatever the game tells you to do. Once it’s fallen into the lava, Sheva will run down and hop over the little boulder-bridge. Wesker will then jump back to the main platform for the final part of the battle.
He has three attacks—one is where he raises his tentacle arm up for a smash, one where he whirls around, and the other is where he shoots his tentacle arms into the ground for a tentacle tornado After he does this latter attack, a spot opens up on his chest (presumably his heart?). Shoot it—it hurts.
There are two ways that you can kill him—shoot him in the face a few times for him to stagger backwards and eventually he’ll perform the tentacle tornado again. Keep firing at his weak spot until a cut scene ends the battle. It takes a while, but you can do it. The other method of dispatching him is to have Chris run up behind him and restrain him after you’ve shot him in the heart. It has to be Chris that restrains him though—the game doesn’t let Sheva do it (haven’t tried in multiplayer though—it could work). In doing this, you’ll be injured–so don’t do it if you’re low on health. If Wesker dies, good news, right? But not at the expense of Chris.
So there’s RoH’s official Boss Strategy Guide for Resident Evil 5. We hope it helped you through some of the more difficult bosses in the game. Have any comments, questions or concerns? Hit us up on Facebook or send us a personal message. We’re always looking to hear from you!
–jeeves86