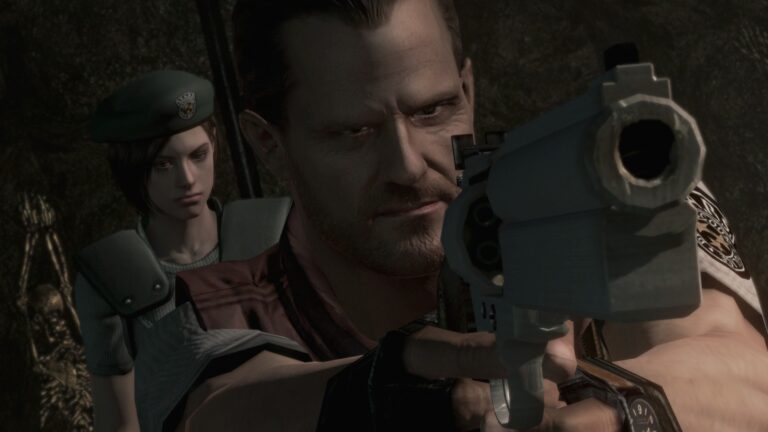
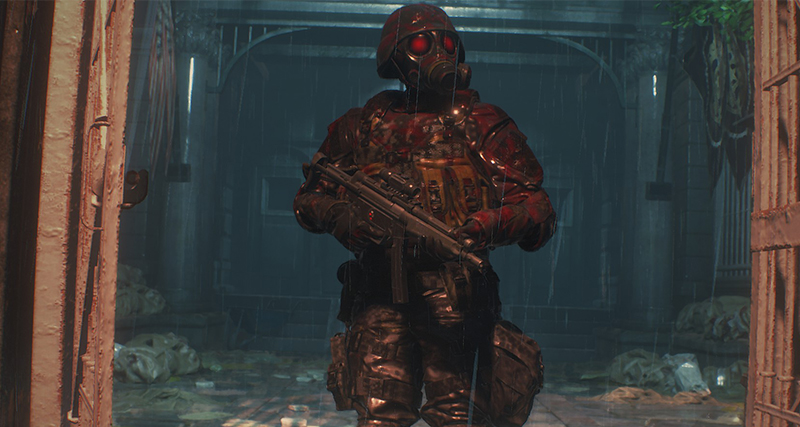
Welcome, dear survivor, to Resident Evil 2‘s ultimate test of strength. For generations, The 4th Survivor has been one of the greatest challenges in the entire series, focusing not on combat, but on the dexterity of your reflexes and planning. Stepping into the boots of USS Soldier HUNK, we are tasked with escaping to the RPD’s front gate while wading through a sea of the undead and worse. With Resident Evil 2 Remake, that challenge has grown tenfold with its new and improved 4th Survivor Mode. Challenging, frustrating, and exhilarating to beat, it quickly became one of my favorite aspects of RE2 Remake. As it is so challenging, I’ve seen many other players say they’ve simply given up on it. No more! This is war, and survival may be your responsibility, but that doesn’t mean that the Grim Reaper can’t make do with a little help to make it through this! Here, I’ve laid out my strategies for completing this gauntlet of the dead, with some added notes on your second run as the ultimate meat substitute, Tofu. I hope you find it useful!
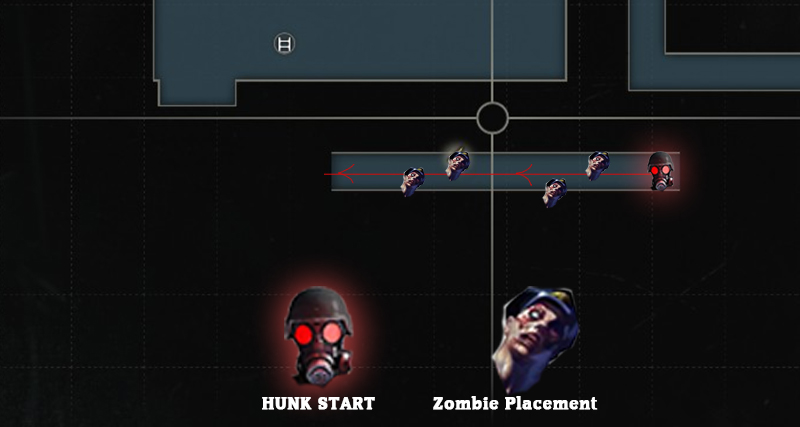
Right off the bat, you’re thrust into the thick of battle. Well, not battle per se, as there are only a few instances where I would recommend fighting. This mode is built around evasion and strategic use of weapons over trying to take out enemies. If you try to kill every enemy, you will die. Here I’ve made some (crude, but what can you do) maps on how best to evade zombies and other enemies. Some of the enemies have slightly unpredictable timing, so be sharp and stay ready to make corrections to your path on the fly. By and large, though, this pathway has reliably led me to the finish multiple times across both PC and PS4. That said, if you have any stratagies that have helped you, feel free to share them below!
NOTE: THIS IS NOT A “NO DAMAGE GUIDE” OR A “SPEEDRUN” GUIDE. I AM NOT A WIZARD, THIS IS JUST FOR COMPLETING THE MODE.
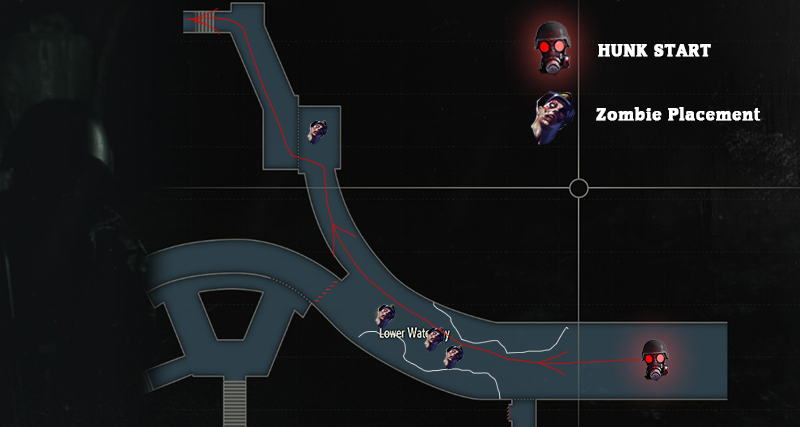
Just after your slide down from your spawn point (and the “My extraction!” conversation), HUNK will be dropped into this hallway, with heaps of garbage on either side of him. While there is a door to your left, it is sealed, so don’t bother. Charge straight ahead and don’t stop moving, even as zombies rise. Keep to the right, hugging the garbage (but not so tight that you’re actively running against the trash, slowing you down). There are three zombies in your immediate path, but you can outmaneuver them if you keep moving. One of them may do that ‘double lunge’ thing they sometimes do as you pass, but if you keep running forward they won’t get you; don’t be alarmed if they do, it most likely means you bumped into something along the way and lost a second of your head start. If you do get injured, don’t heal yet.
The zombie at the far end of the hall, right before you step up onto the ledge, is the first zombie worth killing. Take out your shotgun and pop his dome. It’s just a little too hard to avoid damage (he can even bite onto your leg after you mantle the ledge) and you do not want to waste a defense item this early on. Once you’re up on the ledge, make your way up the stairs.
TOFU STRATS: Charge directly into the arms of the zombie you capped as HUNK. It’s better to be grabbed from the front and use a knife to get out of it than to be grabbed from behind while trying to get up the ledge and take an avoidable hit.
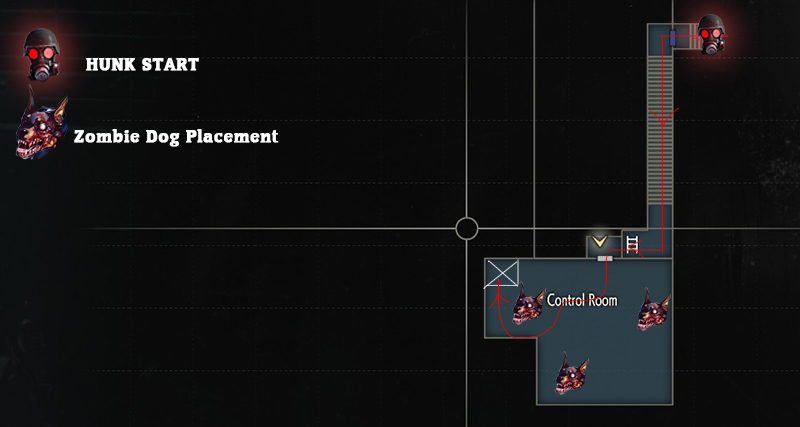
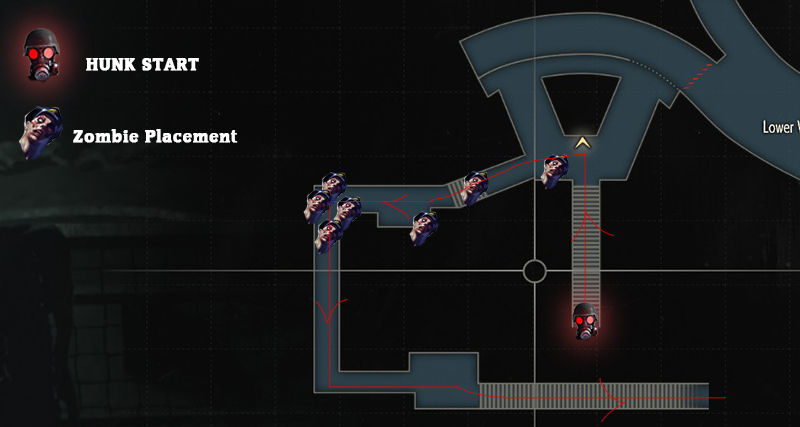
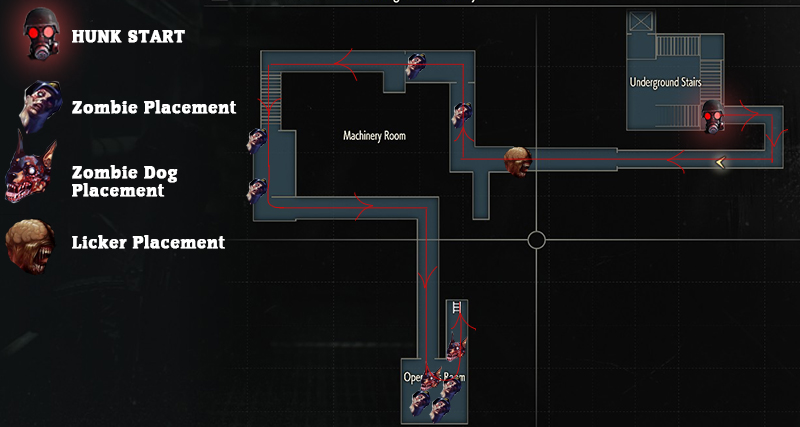
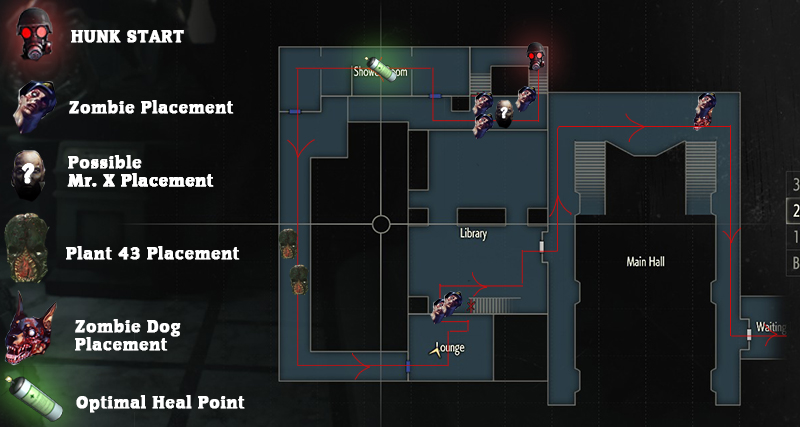
Keep going up the stairs, and then up the ladder (you can see the Umbrella tram from here). The room beyond has zombie dogs inside, which can be tricky but not impossible. Hang a right just as you enter and then move to the left, around the dog next to the empty lift shaft. He will go charging past you, and the zombie dog that was to the left of the entrance will leap past as well. Once the second dog lands/is otherwise out of the way, charge forward and down the lift shaft. Immediately turn around and drop down to the next level.
This is where things start to get tricky. You can (and should) just charge past the group of zombies chowing down, and head to the left, out of the room. The Treatment Pool Room becomes difficult due to the number of zombie dogs that spawn here. You have a couple of options, but first things first, pull out your magnum and blow the zombie next to the bridge’s head off as soon as you see it. It’s easier than wasting health or a defense item. Be aware that the dogs will start charging in one by one across the bridge. Swap to your machine gun, and kill them as they come. They’re simply too unpredictable compared to zombies, and there’s too great a chance of getting mauled and losing a ton of health here. Try to take them down one at a time, and don’t spray and pray; you can’t get more ammo so each bullet is sacred. Pick your targets and put them down like… well, like dogs. You might still take a bite or two, but don’t panic. Don’t heal either, as the optimal point for healing is still a little ways off. If you get down into Danger, it’s honestly worth completely restarting. Even getting into Caution is kind of pushing it, so try your best to take down the puppers before they get a bite in. If you dip down into that sort of murky-colored Fine, don’t worry about it. At the other end of the bridge, there’s a lone zombie with his back turned to you. Charge past him to the right, not the left, and he’ll swing around to try and grab you, but he’ll be too late. Turn to the right and then enter the door to the left and head down the stairs.
TOFU STRATS: This one is even trickier as our favorite protein brick. Since you don’t have any real weapons, charge straight into the zombie you shot with Magnum, and use a knife. The dogs are the really tough part of this equation, though, since you have no way of actually fighting them without immediately taking damage. Do your best to charge forward across the bridge, hugging the right so you can avoid the zombie at the end the same way you did as HUNK. You will more than likely take one or two hits regardless though, so try not to panic. Worst case scenario you get down into Danger, at which point I’d recommend you just restart.
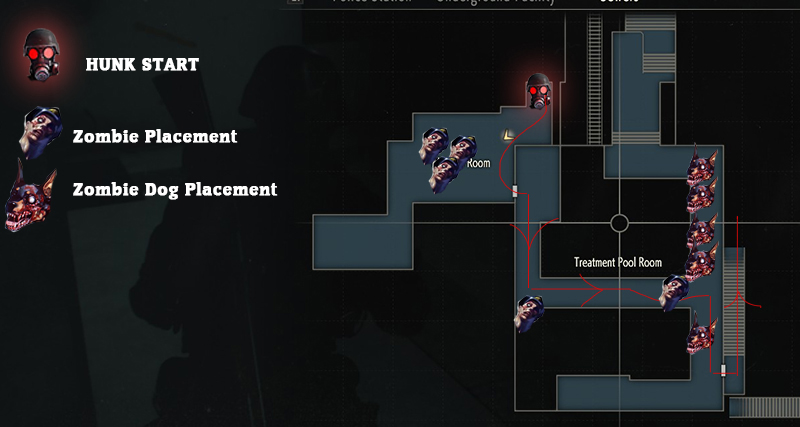
This next part might seem daunting, but don’t worry. 90% of these zombies can be entirely avoided. Head down the stairs and run straight forward and then hang a left. There’s a crawling zombie on the floor that you’ll want to avoid. Now there should be a second set of stairs directly ahead, run down them. A zombie staggers to its feet in the center of them, but ignore him. If you keep moving, he won’t have the time to grab you by the nature of how long the “getting up” animation takes. When you reach the bottom of the stairs, run straight forward into the crowd of zombies that are all getting up, do not stop because there is a zombie hiding just to the left of the doorway at the bottom of the stairs and you’ll take damage you can’t avoid otherwise. When you charge into the zombies, hang a left to cross the bridge — one will probably still get a grab on you (in my experience, probably the zed that’s already standing up, on the bridge). This is fine as long as they grab you from the front. Use a knife to get out of their grip, and keep moving. Cross the bridge, turn left, and head forward and up the stairs.
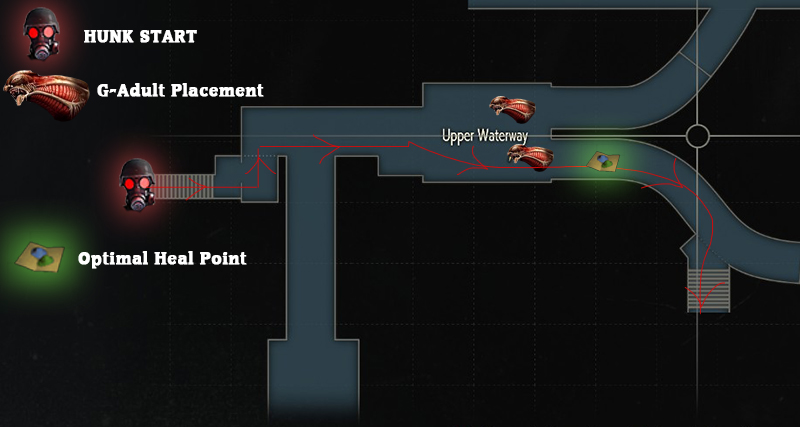
Get ready to heal friends! When you reach the top of the stairs, turn left and hop off the ledge and into the water. Turn right, and run forward. You’ll come to a fork in the road, take the path on the right. A G-Adult will be waiting for you, but he isn’t your problem — a second, swooping in unseen from the left, is. Doing that charging under the surface thing, he’ll run straight for you. Hug the wall to your right, but don’t worry, either him or the G-Adult you could already see will grab you, and believe it or not — take the puke. That’s right, let that sucker chunder all over your face and poison you. Not sure how HUNK is still getting poisoned through a mask designed specifically to keep out toxins, but I guess it is an air filter, not a liquid one. Anyway, once the G-Adult is done barfing on you, reorient yourself (don’t let yourself get turned around, make sure you’re still heading down the right fork in the path) and start going. While poisoned, your movement is extremely hampered, so open your inventory and use that Blue+Green Herb combo that’s been sitting there conspicuously. This will cure your poison, and heal you a tiny bit. If you managed to get to this point unhurt, that’s the best case scenario, but if you did take a few hits, you’ll more than likely be in Caution after using the combo. This isn’t a huge issue, so don’t worry that much about it, but it does mean you’ll have to be a little more on your toes. Keep running, and turn right to mantle the ledge.
TOFU STRATS: Same deal, but this time combine the Red and Blue herbs and take it before even running into the G-Adults. While this can’t heal you, it’ll both completely nullify any poison damage taken from the G-Adult puke and give you a damage resistance boost for the next few minutes.
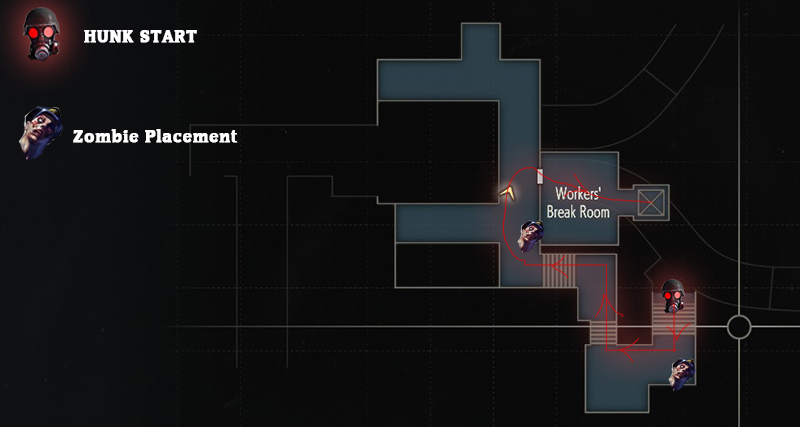
This part shouldn’t be too hard, but don’t take it lightly. Once you’re up on the ledge, head up the short set of stairs and hang a right, ignoring the zombie (even though he’s a member of HUNK’s USS team, very sad indeed) that’s getting up directly at the top of the stairs. Head right again, up the stairs, then left up the next set of stairs — but hugging the right a little bit. Charge straight forward and then curve around to the right, avoiding the zombie just to the right of the top of the stairs. Swing around into the first doorway on your right, and into the Worker’s Break Room, and into the elevator. Hit the button, and listen to the bitchin’ music while you get this brief moment to rest.
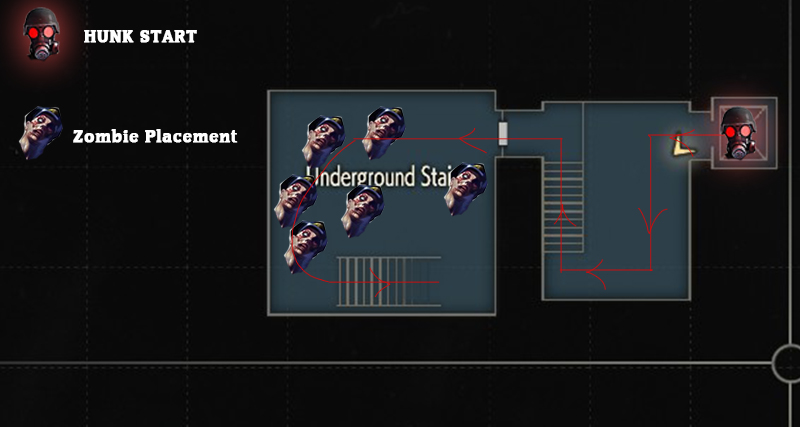
Again, this area looks daunting, but it’s a cinch. Make a left as you exit the elevator, then turn right and up the stairs. Turn left and enter the room. Several zombies will start getting up in the darkness, but keep a cool head and charge straight forward and hang a left as you get slightly past the middle point of the room, keep turning left, and you’ll go up the stairs and out of this shitshow.
Now it’s getting serious. Sorta. At the top of the stairs, make a right, then another right, and run down the hall. You’ll see a Licker at the far end, and once he senses you, he’ll come scuttling. Don’t mess around with him, pull out the magnum and pop him right then and there. It takes 3-4 shots in my experience, but put that sucker down. While you can avoid him at first, he’ll turn around and chase you and it’s way harder to avoid him from behind, so I’d recommend killing him outright. Why go through the extra stress, you know? Once you’re past the Licker, turn right and head for the doorway. A zombie is getting to its feet right in the middle of the platform but ignore him. Once in the doorway, turn left and keep running. There’s a zombie getting up right in front of the exit to this small room as well, but again, ignore him and run around, moving forward and to the left, up the stairs.
Keep moving through the room at the top of the stairs, and don’t stop. Neither zombie in this room (to the right of the entrance and to the right of the exit) will have enough time to even notice you if you keep moving. Turn left and run across the bridge, turning right and making your way to the Operator’s Room. This room is filled with zombies and zombie dogs, but swing to the left and towards the ladder, and none of them should have time to attack. One of the dogs might nip at you, but it should be fine unless you were already in Caution, which could send you into Danger — bad news, and it’s up to you if you want to use the First Aid Spray here or just restart (both are valid in my experience, depends on how much you think you can afford one healing item less). Head up the ladder after you’ve made your choice.
TOFU STRATS: This is almost impossible to get out of without taking damage. The Licker will always swipe out with his right hand, so stay to his left (your right) to run past him. However, be aware that he’ll immediately be on your tail and more than likely get a hit in as you’re trying to run away. If you’ve been keeping the pace up, though, that Red+Blue mix defense should still be in effect, and should keep you from getting too hurt. Be aware though, if you were already in Caution it’s very likely that this will put you in danger, which is not the health you want to be in right now.
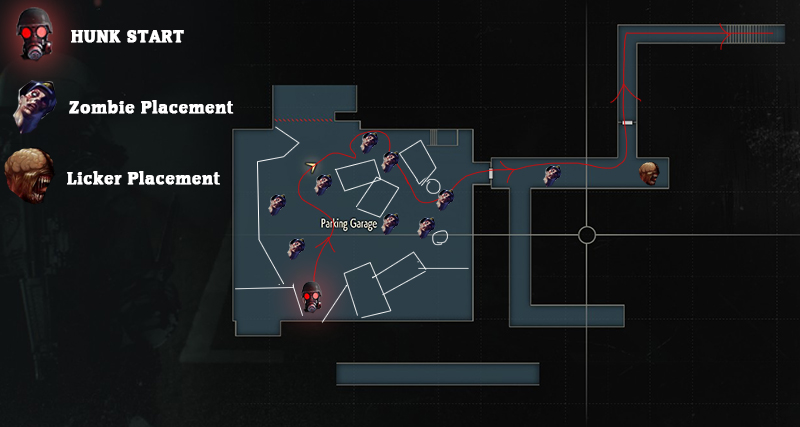
Now we’re getting into some jukes. This area has a lot of zombies, but they’re placed very deliberately. Rush past the two zombies on your left, and curve around the zombie standing up on your right, and then move to the right. There are two zombies standing directly in your path. Move close enough to get their attention, but not get grabbed, and then move back a step or two (stay aware that there are still zombies behind you of course), and then run to the left and around both of the zombies, now that they’ve moved out of your way. Run between the two cars, and turn left at the pillar. There’s a zombie here, but just use a defense item to get out of his grip. Run to the door directly ahead. Inside you’ll see a crawling zombie, and down the hall, a Licker waiting for you on the ceiling. Now there are two ways around this: blow him off the ceiling with a Magnum shot or two, or run forward past the crawling zombie and let him pounce on you. If he pounces, you can just use a defense item to get out of it — but you’ll be less a defense item (which are going to start to become extremely important very soon). Whichever one you decide, once the Licker is dealt with run to the left, through the door, and up the stairs.
TOFU STRATS: You can’t shoot the Licker of course, so just let him eat a knife.
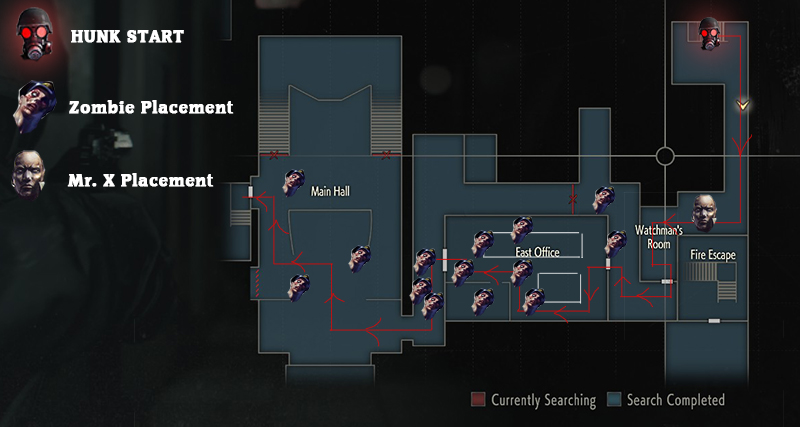
You’ve almost reached the middle point of The 4th Survivor, don’t give up! Do equip the Magnum though. Turning right at the top of the stairs and running down the hall, you’ll find yourself greeted by none other than Mr. X, and he’s here to pound your face in. Hang back slightly so you’re out of arm’s reach of him, and pop him one in his wrinkly face with the Magnum. This should stagger him for a moment, so rush past to the right, turn left, and get out of the Watchmen’s Room. Go right, and there will be a zombie blocking the door to the East Office. Blow his head off with a shotgun, and enter the room. Run around the left side of the room, where the windows are, and cap each zombie in your way to the exit door with the shotgun. Don’t worry about the ammo, you’re getting to the final stretch here (and the two sets of Gunpowder and High-Grade Gunpowder can be mix and matched into either more shotgun shells or more handgun ammo and more magnum ammo; you decide). Another reason for this sudden bloodthirst is it gives Mr. X time to catch up to you. I know that sounds nuts, but there’s a very good reason for wanting Mr. X on your tail. You don’t want him to actually get the chance to hurt you of course, but you also don’t want him to get too far behind.
Exit the room, and immediately turn left, running around the zombies as they stagger to life, and then to the right into the RPD main hall. The exit is blocked, so don’t even check it. Just keep running, ignoring the zombies around you, toward the shuttered gate that leads to the western side of the building, then turn right and head up the ramp. At the top of the ramp, there will be a zombie to the right, Kill him as a precaution to keep him from sucking up health or wasting a defense item. Enter the room to the left.
TOFU STRATS: Mr. X is pretty hard to avoid here, but there’s a chance you can juke him into whiffing a punch. Move forward a bit and then back up immediately, so he throws a punch and misses. Take the opportunity to run around him now and away. You’ll need to use your knives as defense items a bunch here unless you can get the zombies to mill around into a more readily avoidable path. You should still have like two and a half rows of them by this point though, so it isn’t that big a deal. As long as you have at least 6 by the time you reach the second floor, you should be good.
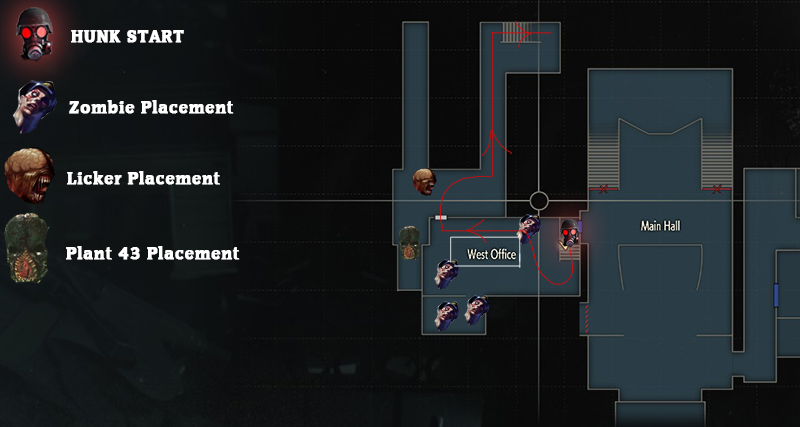
Run down the stairs and turn completely around, facing the zombie to the right of the desk. Shoot him in the head with your shotty, then run around the right side of the desk and out the door. There’s a Licker here, but if you time this right you can stop running just as you get to the door from the West Office and walk quietly forward, without catching the Licker’s attention. Manage this and charge down the hall to the right and up the stairs. Make sure not to get turned around and head left from the West Office, though. A Plant 43 (or Ivy, whatever you wanna call them) is hanging out over there and is an instant kill if you don’t use a defense item, which would be a waste here. Again, if you’ve been doing this right, Mr. X should only be a little ways behind you — this is critical to getting out of some damage soon.
Now here is why I was telling you to keep Mr. X tagging along. We’ve officially crossed the halfway point, and shit’s just going to get harder from here. Now, Mr. X is supposed to spawn here, at the top of the stairs with all the zombies, and will deliver an almost unavoidable whallop. The best case scenario is you still have a Magnum round you can spend on his face, but with everything going on there’s a good chance you’ll miss, or lose your chance thanks to a zombie grabbing you while you line up the shot. However, if Mr. X has been trailing you since you first encountered him back on the first floor, he will not spawn here, giving you some much-needed breathing room. If you’ve pulled this off successfully, pop the handful of zombies with the shotgun and duck into the Locker Room to the right.
Now if you’ve taken enough damage to get into Caution (or Danger, which is most likely if Mr. X spawned up here), and you didn’t use it already, it’d be a good idea to use the First Aid spray burning a hole in your inventory here. Gives you a fresh start before plowing ahead into what waits ahead of you. I don’t recommend using the Red+Green+Blue mix if that’s all you have left, though. You’ll need the defense boost later, so if that’s all you’ve got hopefully you’ve made it this far without getting hurt too badly.
Past the Shower Room, take a left and head out the door, and you’ll see two Plant 43s guarding the hallway. While they’re honestly the scariest creature in the whole game (at least in my opinion), brave them and run directly into their waiting arms. Once they have a hold of you, use a defense item to rock their world, and get outta there asap. The defense item should stagger both of them, as one collides into the other, so they shouldn’t be a problem anymore. Hang left and run into the Lounge. The door to your left will be getting pounded on from the other side, indicating a zombie wants in. Run up to the door’s right side, so when the door bursts open, you won’t get stun-locked by it hitting you in the face. Time this right, and you can rush inside and past the two zombies (one that just burst through, and one getting up just inside the Library). Run to the door to the main hall, ignoring the bodies that fall from the third floor (they’re more of a jumpscare and won’t be a problem unless you decide to hang around for some reason). Out on the second-floor balcony, turn left, then right, running past the Lion Statue. There’s a dog chowing down on a zombie’s foot here, but if you keep moving the time it takes them to get out of their animations will give you more than enough room to stay out of harm’s way. Turn right, and make your way down to the first door on your left and go through.
TOFU STRATS: Hopefully you won’t be too messed up, because you need the extra breathing room that Red+Green mix can give you later.
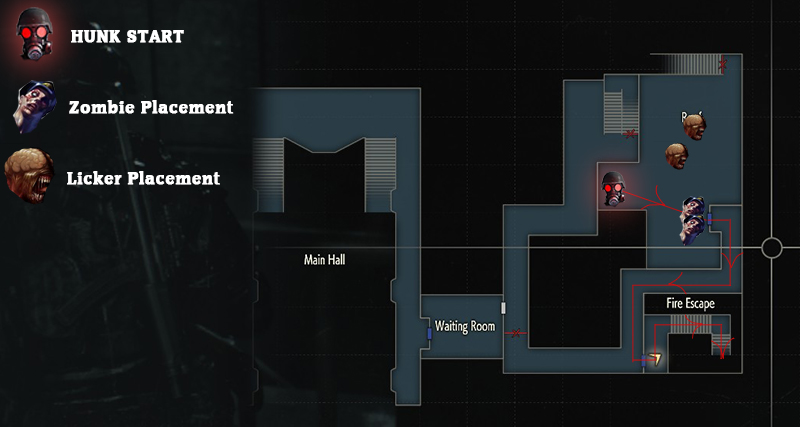
Inside the Waiting Room, you’ll see that the door on the opposite side is rattling with that telling zombie-wants-in shudder. The best option is to wait for the door to burst open, then kill each zombie one by one with either the shotgun or the magnum, and run out. I have managed to simply run around all of them, but it was kind of a crap shoot and I had trouble replicating it, so you’ll probably want to just kill them if you don’t want to risk the damage. If you used the First Aid spray back in the shower room, you can probably survive a bite or two here, though, so feel free to risk it.
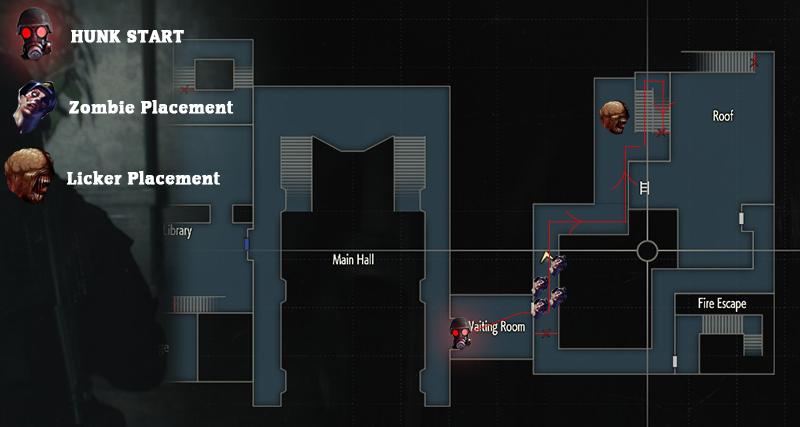
Once you’re away from the zombies (dead or avoided), turn left, then right, then left again. A Licker waits for you next to the stairs and will come charging at you as soon as it sees you. Hug the right side wall, where the red fire hose (or whatever it is) box is, and the Licker should completely miss you with its swipe. Run for the stairs, and the Licker won’t be a problem anymore.
TOFU STRATS: Let the first zombie grab you, and defense item your way outta there.
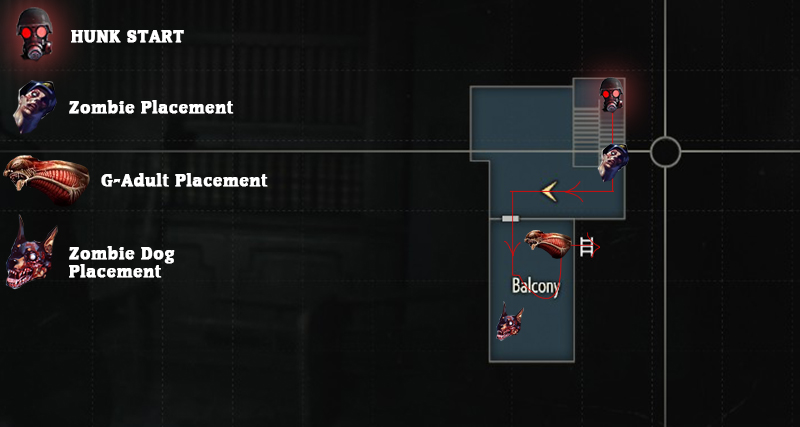
We’re getting there, friends! Can you feel that tension!? At the top of the stairs, a single zombie waits for you. Pop his dome, and head out onto the Balcony. There’s a G-Adult to your left, so run forward towards the zombie dog, then hang left, running around the G-Adult and down the ladder. Easy-peasy-lemon-oh god there are Lickers at the bottom of this ladder.
TOFU STRATS: You can’t defend against the zombie at the top of the stairs while he’s on the stairs. Aggro him and lead him down the stairs to the landing between levels. Now let him grab you, and sink a knife into his stupid rotting chest.
Once at the bottom of the ladder, stop running; you don’t want to catch the attention of the Lickers to your left. Move forward towards the door, but be cautious of the two crawling zombies guarding it. Once you reach the door, start running again. It’ll take the Lickers too long to catch up, and they can’t open doors. Follow the hallway to the first door on the left, and outside to the stairs.
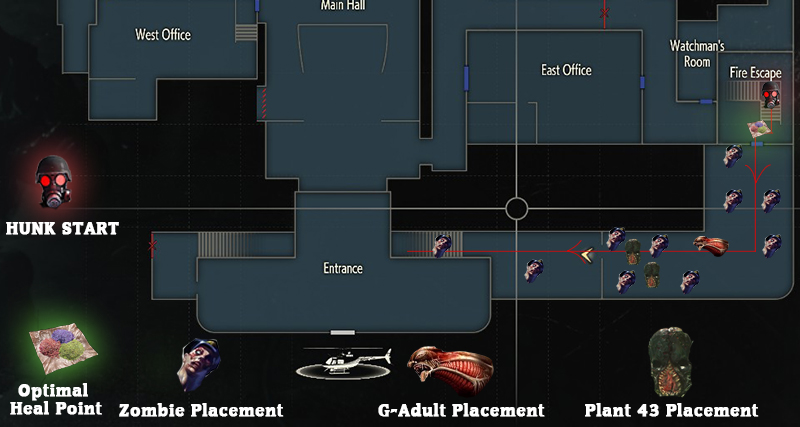
It’s the final stretch! Be ready to go into all-out war mode as there are a ton of enemies out here. Your blood should be pumping by now, but fearful is no word for it. When you reach the bottom of the stairs, you’re greeted by a fence leading out towards the RPD Entrance, with a zombie standing next to the gate. If you still have it by now, use that Red+Green+Blue mix you’ve been holding on to this whole time. This will completely heal whatever wounds you’ve got and give you a defense boost before you go charging out into the sea of undead. Obciously, it’s now time to go charging out into that sea of undead. Make your way to the G-Adult that comes from the right, and try to run around him (if not, just take his puke- it won’t hurt you anyway). Past him, there’s a group of zombies and Plant 43s together; run directly into the heart of them. Whether you get grabbed from behind by a zombie (which won’t hurt that much with the defense boost active) or from the front by either a zombie or a Plant 43 (in which case you should use a defense item) this shouldn’t be a huge problem. Hell, if you wanna play it risky, toss a grenade or flash grenade into the center of them, and then go running through while they either rain down around you or try to reorient themselves from the flash. Race to the stairs, and pop the zombie standing at the top with whatever you have that happens to be the most powerful, with the most ammo left.
TOFU STRATS: Ahhh! This is actually kind of insane as Tofu, but do basically the same thing here. Use that Green+Red mix you’ve been holding on to (if you still have it) immediately after taking any damage once you go past the fence (or right before, if you’re already in Danger). Use those last few defense knives to get through this!
You’re almost there, rushing through the path below the RPD front entrance. A few zombies populate here, but a shotgun/magnum shot to each will remove them from the equation. Run up the stairs, turn left, turn left again, and rush for the front gate. Hit your interact button and you’ve made it!
TOFU STRATS: This is really pushing it. Try to run past the zombies in the underpass, keeping on their backside to force them to have to turn to attack. Run up the stairs, turn left, turn left again, and rush for the front gate. Hit your interact button and you’ve made it!
Congratulations, Mr. Reaper. You’ve pressed through Resident Evil 2‘s greatest challenge and lived to tell the tale. While HUNK’s mission is over (and his dark cargo delivered into the hands of the Umbrella Corporation), Tofu may have some added reasons to return once complete. Take home your trophy or achievement, and know that you’ve mastered The 4th Survivor, friend. Remember:
DEATH CANNOT DIE